-

Sunday, February 28, 2010

Crystal Gardens Tutorial

Want a fun project for for you to do with your kids? Try a Crystal Garden. It's amazing how your garden will change on a daily basis. But just remember, once your garden is set DO NOT TOUCH, it may disturb the unique process. I found this great recipe in "Crafty U"

What you will need....
  • Freezer bag
  • 6-8 charcoal briquettes
  • hammer
  • small bowl
  • distilled water
  • Pyrex glass bowl or pie plate
  • Jar with airtight lid (canning jars are perfect)
  • 1 c of ammonia
  • 1 c and 2 tbsp of non-iodized salt
  • 1 1/2 c laundry bluing
  • Food coloring
Step 1 - Place briquettes in freezer bad and break into chunks with a hammer. About 1 inch in size. Put chunks into your small bowl and cover with distilled water. When completely saturated (bubbles will stop floating to the top) drain out excess water and transfer pieces to your pyrex bowl or pie plate.


Step 2 - Using your air tight jar, combine ammonia, salt and laundry bluing. Mix well. Pour half of that mixture over your briquettes and then cover you jar with air tight lid. until you need it again.

Step 3 - Scatter drops of food coloring over the briquettes. Then sprinkle Salt over also.

Step 4 - Set your project aside in a safe place (away from young children and pets). Check it every day to see the growth process. When the bottom of your bowl becomes dry, add a little more of your ammonia mixture. But remember to shake up mixture before adding. The settled mix will not work as well. Do not pour over the crystal they are fragile. Just add to the bottom of your dish.

GROWN-UPS.... The mixture, which contains dissolved salt, is drawn up through the pores in the briquettes and evaporates, leaving behind layer upon layer of salt-crystal formations. This process continues until all the liquid evaporates. The colors come from the liquid absorbing the drops of food coloring on its way up.

This is nice to know because little ones may ask questions like How does this work. Now you know and you can act like you knew all along. LOL

Have fun and please share your Crystal Gardens with us. Email pictures to trendytreehouse@me.com

Continue Reading ...

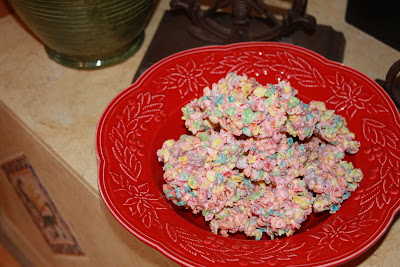
Fruity Pepples Treat


I have the best recipe for any holidays. I made a yummy treat with Fruity Pepples. You will definitely have to make these for your next holiday or get together. They will be a hit.

What you will need...
  • 1 box of fruity pepples cereal
  • 1 bag of white chocolate blocks
  • 2-3 large cookie sheets
  • Wax/Freezer paper
How to make....
  • In a microwave safe bowl melt all of your white chocolate according to the bags directions in the microwave. In my case it was for 1 min. 30 sec. Stir. Then every 15 sec. until melted. Just don't over heat the chocolate because the chocolate will harden and not work.
  • Next pour the whole box of Fruity Pepples cereal in. Mix until all chocolate is coated.
  • Grab 2-3 large cookie trays and cover them with wax/freezer paper. Drop spoonfuls of your treats on the cookie sheets. Small is good. They are very fruity and sweet. Set aside to dry. Then enjoy.
They are a big hit in my house for the holidays. We made them a couple years ago. Not sure where my mom saw the recipe. But I knew I had to make them again this past year.

Also try this with.....
  • Cocoa Puffs - Yummy Chocolate
  • Mix your favorite cereal together
  • Pop Corn - this is excellent too!
  • Chinese Noodles and Cashews
Hope you enjoy them and the recipe change suggestions as much as our family does!

Continue Reading ...

Saturday, February 27, 2010

I-Dog Plush Puppy Review


The I-DOG PLUSH PUPPY pet is a girl's best friend! A smaller version of the popular I-DOG SOFT SPEAKER, this cuddly, pint-sized pup is always ready to rock. When plugged into any MP3 player (not included), the I-DOG PLUSH PUPPY will broadcast girls' rockin' tunes. Available in a variety of colors, the I-DOG PLUSH PUPPY also features the classic I-DOG color dot representation on its face. No batteries required. Available at most major toy retailers nationwide and on HasbroToyShop.com

I received the I-Dog plush Puppy thanks to Hasbro. It is the cutes little puppy. As soon as we got it we plugged it into my iPhone. So, so fun! It has a great speaker that plays music straight from your playlist and is soft enough to cuddle with. When you press the I-Dog plush puppies nose, it lights up and plays music. My kids thought that was just so funny. They loved it so much, that they kept pushing his nose over and over. I think this is a great gift for Christmas for any kid. I might just be buying a couple more. With 4 kids, you know they have to have their own. We really love our I-Dog plush puppy and recommend it for all music lovers. 

Things that I love....
  • The iDog plush puppy is soft and cuddly. Your kids will love its soft fur.
  • You can hook up the iDog to your iPhone, iPod and MP3 player for music anywhere.
  • Fun music and lights make this pooch a mush for Christmas this year.
  • Take the iDog on the road or for a fun sleepover. Your kids will love sharing their I-Dog
  • The price is perfect for gift giving too!
The featured product {s} in this post were provided to me free of charge by the manufacturer or pr company representing the company. All opinions expressed in this review are my own and not influenced in any way by anyone.  Disclaimer/Terms of use.
Continue Reading ...

Easter bag Tutorial

I realize that Easter is still over 4 weeks away, but it's never too early to get started on little projects for the occasion.

Last year my mother-in-law and I were at Target when we saw these cute little felt Easter bags in the dollar spot. I was so tempted to buy one for each of my kids but decided that I could make my own and it wouldn't even cost me a dollar per bag. So, I bought a little more felt and used some that I already had and when I finished I had two Eater bags for approximately $1.40. So, it's not a whole lot cheaper than the ones at Target but these are handmade with love AND personalized.


What you need:
2 9x12 sheets of felt same color
other felt scraps
coordinating embroidery floss
sewing machine


Here's a tutorial for those of you out there who'd like to make your own Target knock-off Easter bag. Please know that I'm not a perfectionist nor do I really know that much about sewing, so take that into consideration while reading/following this tutorial. I took two pieces of 9x12 felt and cut off two inches from the shorter side, these will be your handles.


Fold the handles in half and sew 1/4 inch from the edge (no need to turn under since felt does not fray). Then sew 1/4 in on the other side too, so you have two seams on the handle (the second seam just makes it look better, there's no real use for it).


Next, take the two big pieces together and sew along the two shorter sides. (Sorry that I switched colors I decided to work on Micah's bag first...hence the blue.)

Cut a square off each bottom corner (I made 1 1/2 inch squares) and then stitch the bottoms together.


Squish the square together and sew, this will be the bottom of the bag. (Sorry for the bad photo, my nice camera is in the shop so I had to use my little digital!)


This is what it will look like once you've sewn the bottom pieces together.

Now turn the bag right side out and you're all set (for the most part).

I like to make my bags a little studier so I find the corners and sew a seam all the way up from the corners. This makes the bag more rigid. Just make sure to back stitch at all ends since little kids will be playing with this. You want to make it as sturdy as possible.


Next, add your handles. I just picked a place where I thought they looked good and stitched them on. I used a continuous stitch and made sure to back stitch at the beginning and the end. I also added a little "X" in the middle to make it look a little better. The trick that I've found for making handles go the right way is to hold the piece that is going to be the handle flat in front of you and then just drop your hands down towards each other and you should get your handles going the right way.


Once the bag was finished I hand sewed on a little chick and an M on Micah's bag. I made a document with some bunnies (I used the white one for Naomi's bag) and a chick to copy and letters to trace for the bags. I just eyeballed the animals but cut out the letters and actually traced them onto the felt.


Then it came time to get this on their Easter bags. First I sewed the eyes and beak onto the large yellow body, then I sewed the legs onto the bag followed by the wings and the little tuft at the top. Then I sewed the body on and before closing it all the way I added some poly-fill to make the bag pop!


This project really didn't take me too long and it was great to work on while sitting outside watching the kids play and an easy project to do while watching TV (once the initial bag is sewn that is.) Let me know if something is not clear and I'll try to clarify.


Don't feel like sewing your own? Leave me a message at my etsy store and I'd be glad to make one for you!

Jamie's Signature #2
Continue Reading ...

Friday, February 26, 2010

HEXBUG Nano Review

Possessing an uncanny sense of balance, the HEXBUG Nano can even flip to its feet and zoom forward when turned on its back! When coming into contact with an object in its path, the energetic insect will switch directions and scurry away on a new path due to its persistent random behavior.


What is more, each HEXBUG Nano is assigned a unique serial number and point value system that owners can u
se to register their Nano online, earn points by answering quiz questions about great scientists in history, achieve levels in an online game that requires players to use scientific principles to build their own virtual Nano, and hunt for rare creatures with the highest point values. You can find this great website at http://www.handandstars.com/ Just use the unique serial number found inside the packaging. The site is for kids 12+ but younger kids are sure to enjoy it as well, they just need to be supervised by a parent.


The HEXBUG Nano is tiny, obedient and intelligent- a welcome change to some of the distant relatives you’ll be visiting with over the 
holidays! Available in purple, red, blue, green and orange, the HEXBUG Nano retails for $7.99 and can be found at ToysRUs and RadioShack stores as well as http://www.hexbug.com/nano


 When I go the HEXBUG Nano in the mail, I was ex
cited. We have gotten a lot of laughs watching this toy bug make its way through many mazes that we created. We received 2 of these HEXBUG Nanos thanks to Innovation First International. Each of us made mazes with just things around the house. Dominos, books, toys, boxes, legos, just about anything you can stack up and make into a maze. It is amazing how these things just maneuver around and flip over the objects. Every time they come out. Just so fun to watch and play with. A must for the stockings this year at Christmas. Your kids will love them!

What I love....
  • So fun, you will play with them for hours.
  • Adding this to family game night is a real treat.
  • There are 5 different colors to choose from.
  • The price is right! Just $7.99 each and available at Toys R Us too!
The featured product {s} in this post were provided to me free of charge by the manufacturer or pr company representing the company. All opinions expressed in this review are my own and not influenced in any way by anyone.  Disclaimer/Terms of use.
Continue Reading ...

Thursday, February 25, 2010

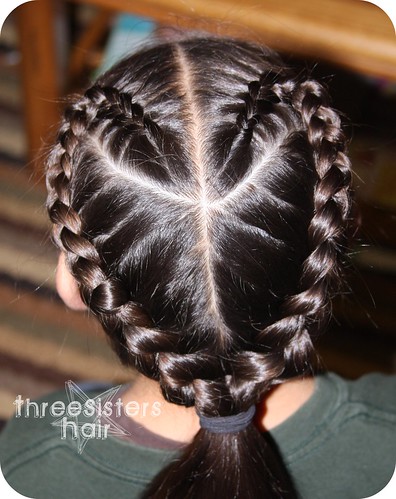
★ French Braid Heart Tutorial ★


Are you ready for another adorable Heart Hairdo?

Well I know this would have been nice for Valentines. Sorry. But you can still use this fun hairdo to go just about anywhere. I love it!

Ready to learn? Let's get into the directions....

IMG_2851
Step One: Parting the Hair
  • Part the hair right down the middle, making two pony tails. (Secure one side with a rubber band while you finish parting the other side.)
  • Take one side of your part and part it down the middle towards the ear. As if you were making a half pony on top. (secure bottom section with rubber band until ready to braid)
  • Now take the top half and part into triangles. (basically from the middle of the head towards the eye of the side you are working on. Secure the hair closest to the ear until ready to braid)
  • Do the same on other side of head. You should now have 6 sections of hair. 5 of them secured with rubber bands and one section ready to start. (in picture above, I put rubber bands on all sections so you could easily see the parts. It makes a pretty pattern, doesn't it?) LOL
IMG_2852
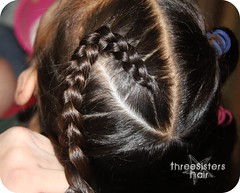
Step Two: French Braiding the hair
  • Start by taking your first top left section of hair. Braid from crown towards left eye. When you get to the end of your first section, remove the rubber band from the hair near the left ear and continue to braid down towards the back of the head. (see picture below) Are you starting to see your heart yet?
IMG_2853
  • Now remove the last section from your left side ponies and just continue to braid to the base of the neck. (try to braid to the middle rather than straight down. That way you make the point for your heart)
IMG_2854
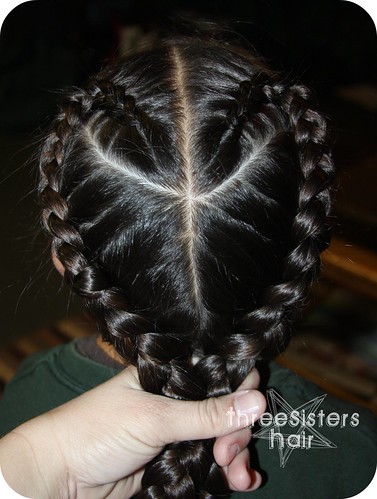
  • Continue with Step Two for the right side of the head. (the picture below shows you what you should have after completing the braids on both sides.
IMG_2856


Step Three: Finishing Up
  • Now Gather the hair at the base of neck. Pull together making a point for your heart. (secure in place with a rubber band)
IMG_2857


That's all there is to this "French Braid Heart" Hairdo!
Now isn't that a cute style for any day !

IMG_2861

Tips on how to finish this Hairdo....
  • weave a ribbon through the braid to add color and a fun look
  • add a bow at the bottom of your heart
  • braid the bottom pony tail into a bunch of tiny braids and either let hang loose (LOL) below or pull up into a loop under the pony.
  • combine all three tips for a really FUN look!

Sharing at...

Continue Reading ...

Sunday, February 21, 2010

Easy Peasy Flower Tutorial

IMG_8717

This is a very fast flower to make when you need a last minute flower for your daughters hair, a gift, pin or just whatever....it's very easy and very fast.

IMG_9789
What you will need...
  • 3 fabric selections (have fun with the colors)
  • Fray Check to seal edges of your fabric
  • Small plastic rubber bands (3)
  • Brad for center of flower
Here's how to make them....

IMG_9791
Cut your fabric in 3 different sized circles. Use fray check on edges to seal so your fabric will not fray. Or if you like fraying, just leave it as is. That is what I did with this one. I like a little fray.My largest Circle in 4" round and I just cut the others to the size of my liking. Make sense? Hope so. LOL! Now stack all of them together, largest to smallest. Turn over.

IMG_9793


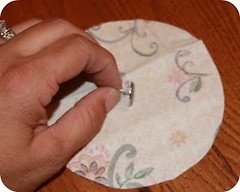
Get your "BRAD" and place in the center of the upside down fabric circles. Carefully turn back over keeping all the circles in line and brad in center of the back.


IMG_9795


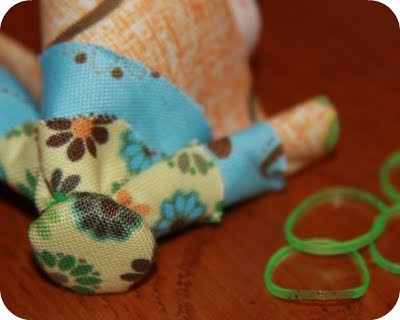
Carefully pull back your fabric around the brad and secure with 3 plastic rubber bands. You can find these in the hair section of just about any store. I have also found them in great container, good for storage, in the infant toddler sections.

IMG_9796


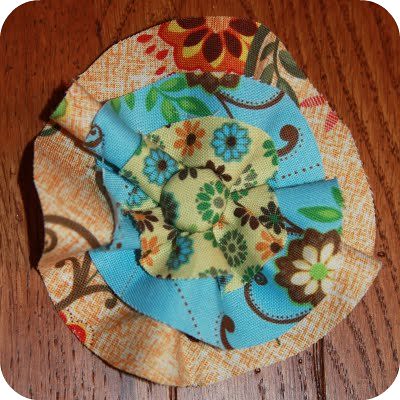
Next, you want to gently pull back your fabric in the shape of a flower. The rubber bands will help in shaping your flower by ruffling the fabric a bit. Just be careful not to tug too hard because the rubber bands will pop right off. LOL And sometimes smack you in the face. Hee! Trust me I know!

IMG_9798


Then all you need to finish this is a small round piece of felt (this helps hold your flower in place and gives it a nice finished look) for the back and your choice of clip, barrette or pin to finish it off. Depending on how you want to use it. You may even want to make a bunch to decorate a purse or wall hanging. Be creative.

IMG_8742

There! Now you have a finished 

"EASY PEASY FLOWER"


Make it Yours @ My Backyard EdenDIY Day @ ASPTLThe Girl Creative


Continue Reading ...

DIY Cheese Crackers

Make your very own CHEESE CRACKERS and save!

These tasty treats will be a hit with the kids. Whether you like them plain, with a pinch of salt or with added seasonings, you will love them. This is a very simple recipe, so easy to make and it will save you tons. You can always buy bulk and save a little, but there is nothing like get
ting in the kitchen with the kids and teaching them how to make their own crackers.

What you will need...
  • 2 c. sifted all-purpose flour
  • 1 pinch salt
  • 6 oz. shredded cheddar cheese (be creative and use Jack or both)
  • 1/2 c. butter, melted
  • Bowl
  • Clean solid surface for rolling
  • knife (let mom and dad use this)
  • Plastic Wrap
  • Baking Sheet
  • Cooking Spray
What to do...
  • Preheat the oven to 325˚F.
  • Mix together the flour and salt.
  • Stir in the cheese.
  • Then stir in the melted butter until cheese dough is firm.
  • Wrap in Plastic Wrap & chill for 30 min. This makes the dough easier to work.
  • Roll the chilled dough into long ropes.
  • Cut ropes in 1/4 in. pieces.
  • Place them on a lightly greased baking sheet keeping them about an inch apart. (take a fork and poke each cracker. You can also form them into squares if you like, just work them with your fingers, this is fun for kids too!)
  • Bake each batch for 20-25 min. until lightly toasted on the bottoms of the crackers. Also make sure the tops of the crackers are firm to touch.
  • Take them out to cool and then enjoy
I suggest...
  • Making this a fun activity for you and the kids ~ Teach your kids about measurements. Let them do the stirring and rolling. After you cut them out show them how to place them 1 in. apart on the baking sheet. Your kids will be proud of what they made.
  • Adding this to a Mommy & Me activity ~ Have crackers ready made, but also have Mommy's help their little ones make the dough. Let them take home the dough so they can chill it then bake at home. (be sure to do this towards the end of your Mommy and me day so the dough stays fresh until they get home)
  • Ask your child's teacher if you can bring these yummy treats in for snack day. Include a recipe for the school so they can make it with the kids too! You can even print up cute cards with the recipe on them to send home with each student.
  • Make a big patch of these up and make a party mix by adding peanuts, cheerios, pretzels and fruit bits.
  • Roll them out and cut into different shapes. (squares, diamonds, circles, stars, ect.)
Have fun making and saving with these yummy Cheese Crackers!

I couldn't find my photos. Sorry. These wonderful photos courtesy of Google Images. 
Thank you Google Images!
Continue Reading ...