-
Showing posts with label women. Show all posts

Friday, May 3, 2013

DIY: Avocado & Banana Face Mask

Today Kendra is bringing us a great recipe for a refreshing facial mask. Thank you Kendra!

All-Natural DIY Beauty: The Avocado and Banana Face Mask

In honor of Pregnancy Awareness Month, we want to help moms everywhere to take some time out to unwind and pamper themselves. With the stresses of managing your household and tending to everyone's needs but your own, moms can frequently feel a little frazzled. That's why taking time to treat yourself to a luxurious at-home spa treatment is one of those many crucial "me moments" that every mom should occasionally have.

Throughout my career in the travel sphere, I have been fortunate enough to experience a great deal of breathtaking views.  A personal favorite for family and business, Honolulu is one of the most stunning places in the world.  As the most geographically isolated area of the globe, the island state always leaves me feeling relaxed - even as a mama of three, a hard feat at that!  

Honolulu is also home to some of the world's greatest spas. At the Royal Hawaiian Hotel and Spa, ranking amongst Honolulu’s best hotels for spas and facials, guests can indulge in the Abhasa Tropical Facial. Using simple ingredients from nature, many of which can be found in gardens and grocery stores, this beautiful treatment puts moisture back into the skin naturally.

You might not have any plans to jet off to Hawaii in the near future, but you can still treat yourself to a beautiful at-home mask inspired by the Abhasa Tropical Facial. This mask is moisturizing enough to soothe dry and sensitive skin types, but shouldn’t cause blemishes for those who are oily or acne-prone. Here's how to make the Avocado and Banana Face Mask for your at-home spa night.
Avocado and Banana Face Mask

You'll need:

1 Avocado
1 Banana
2 tbsp Olive Oil
1 tbsp Honey

What to do:

Mix the olive oil and honey together and combine with a whisk or fork. The honey won't fully mix with the olive oil, but that's okay. Mash the avocado, using a blender or food processor if necessary, and mix into the olive oil and honey. Mash the banana and add last to the mixture, vigorously mixing all ingredients together.

Be sure to fully cleanse your skin and remove all makeup before applying any mask. Apply evenly over the face, neck and chest. Excess mask can be applied to other areas of the body that need extra moisture or stored in a container in the fridge for a day or so. After you've applied the mask, allow it to sit for 10-15 minutes. Rinse off with warm water. Finish with a serum or moisturizer for truly luscious and resilient skin.

Thank you again Kendra for guest posting today & sharing this facial mask with us!
Continue Reading ...

Tuesday, September 18, 2012

Framed Pin Cushion from Pine Creek Style


My mom is visiting us again today. She made me the cutest pin cushion.  I shared it on Instagram and a few people asked how to make it. My mom was happy to share it with us. Read below for her how to.... ;)

I have seen some cute things done with picture frames lately. And they have been on my "To Do" list for TOO long!
 Picture Frame Pin Cushion...Functional & Cute!
 *See the above items you'll need.
**I used the back cardboard from an old tablet to attach my padding. It was just the right thickness; sturdy but not to thick!
 Cut several thicknesses of quilt batting to use as the pin cushion. I cut two pieces larger than the rest. The larger batting is the backing for the cushion. The smaller pieces fit just inside the frame opening allowing thickness on the inside/open part of the frame. i used 8 smaller pieces for my thickness.
 I used burlap for my outer material and a thin piece of muslin for the backing. This way, none of the batting would come through the larger weave of the burlap fabric.
 Neatly fold the fabric around the batting closing in the cardboard backing. You may glue, tape or sew it in place if you wish.
Then I replaced the back to the frame. That simple, that fast.
I sent a cell phone photo to my daughter who replied; "I want one!"
So the one on the left is Tara's (from Trendy Treehouse) and the right is mine!
**Note my scissors....After years of having many scissors ruined by being used for the wrong items....I NOW mark my territory! 
Haha...I feel your laughter....IN agreement! :)
There's more...See what Tara DID to my gift!!!

Update:
I gave Tara her gift (pin cushion frame) this past weekend! She loved it! 
She also loves StringArt! 
Using straight pins, she created a pretty StringArt Style pattern on her pin cushion. 
Then she sent a "Thank You" photo to Me!
Very, Very Cute! Of course I had to share!

Would love to hear your comments!
Just Framing MY Style...
NeeCee Signature
Tara had fun with her photo apps! :)

Thanks again MOM for making this for me and helping ChaCha make one too!

Make sure you stop by my moms blog and say hi and thank her for this tute! You might want to also click that follow button too. She has some pretty cool posts over there!
Continue Reading ...

Tuesday, February 21, 2012

T-Shirt Headbands

Thought I'd change it up this week! I have been sharing T-Shirt Scarves for the past 4 weeks. Here they are...Scarf 1Scarf 2Scarf 3 and Scarf 4, if you want to check them out!

Well this week I thought I would share a t-shirt headband. As I was making one of my scarves with my mom (@Pine Creek Style), we thought it would be cute to use the same method on a small t-shirt for a kids headband.

I used the same method as the no sew scarf. See Scarf 2 for directions. Just used one of their old shirts. The size of the shirt was a 2T. It will be a little big, so I recommend a smaller shirt because after you stretch it out, well you know, it gets bigger. ;) I would say a 12 mo. shirt would be great.

...Look at how cute it turned out...
She really is happy to be wearing this. LOL I just thought it was a cute pic. Here is one of her smiling and showing that you can wear a clip with this too!
I love it and made a few of them for the girls. They even look cute with pony tails. The one below is another color I made.
And my oldest loved wearing hers too! Perfect for all ages. Mommy's too!
Cute! Cute! Will you make one? Have you made one?
These t-shirt headbands are awesome and a quick way to turn a simple hairdo into a fancy one!
Continue Reading ...

Tuesday, February 14, 2012

T-Shirt Scarf - Part 4

I'm back with another t-shirt scarf today! 
For those of you who haven't been here, I have been sharing a different tutorial for a t-shirt scarf every week. Visit Part 1Part 2 and Part 3 to see what I have already shared.

....The Loopy Scarf....

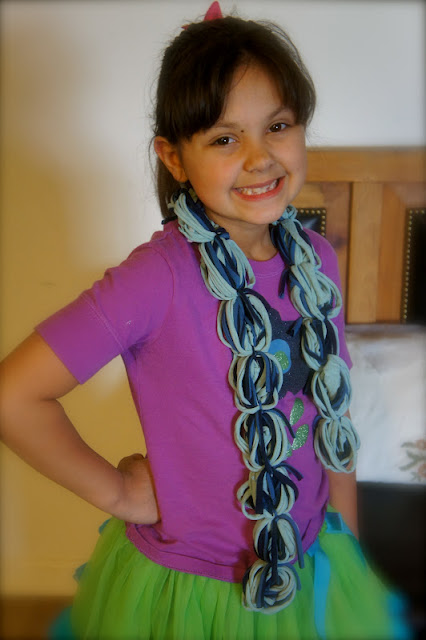
Today's scarf is another no sew scarf. For this one I used two different shirts.
Next cut strips out of both t-shirts. 

Cut from armpit to armpit. Cut the hem off the bottom of the shirt. Then cut strips. Cut all the way off so you have individual strips. Stretch each piece to curl the fabric.
 
Once you have all the stretched strips, take two, one of each color and twist and fold them into circles. You can make large circles or small circles. For this one I made small circles. The small circles make a perfect length for a child's scarf. If you make your circles larger, they will be longer for an adult.

Cut some small strips from the top of your shirts to tie your circles together. I cute them about 4 inches long. Stretch those out too then tie the circles together making the scarf. You can cut the excess fabric from the ties or leave them. I left mine.
This turned out to be a pretty cute scarf. I like the tow colors mixed together!
And my daughter looks pretty darn cute wearing it! Wear it like a normal scarf, hanging straight down or you can slip one end through antoher circle to hold it in place.
And since today is Valentine's Day, we had fun with this picture for you.
{Happy Valentines Day Everyone}
It makes a pretty darn cute heart too!
I do have more t-shirt scarf ideas, so check back again next week.
Continue Reading ...

Tuesday, February 7, 2012

T-Shirt Scarf - Part 3

Hi Everyone! Are you ready for another t-shirt scarf? For those of you who haven't been here, I have been sharing a different tutorial for a t-shirt scarf every week. Visit Part 1 and Part 2 to see what I have already shared.

....Today's Scarf....
Today's scarf is very easy to make. I don't have a lot of pictures today. You won't need them. 
Just grab an old t-shirt. Use a salad plate and a piece of cardstock to make a template. Cut as many circles as you can from your shirt. I was able to get 12 circles from an xlarge shirt. Next, cut each circle in a spiral pattern.
Stretch all the pieces out. When you stretch out the spiral it looks wavy.
Now just take a scrap piece of fabric and tie all the pieces together. You can also just tie a knot instead of the scrap fabric, but I didn't like the thickness of the knot on my neck. Using a scrap piece made it more comfortable.
I got a request for me to model my scarf. LOL I don't usually model them myself. My daughter volunteered to wear this scarf this week. She looks cute. In fact, my girls have been wearing all of them to school. I haven't even been able to wear one yet. They have even got teacher gift requests. LOL That will make things easy. Anyway, here is my model for this cute scarf.
I like this scarf because it is light. You can wear it anytime of the year as a cute accessory. I haven't tried it yet, but it would be cute to take a few pieces and braid them too.

Also, while making these beautiful scarfs, I was able to make one for my daughter's friends birthday. I used the no sew method. I had to share it today because I love how it turned out. I used one of my dad's shirts. My mom had bought my dad and my hubby these bright tie dye shirts as a gag gift. Who knew that they would make great t-shirt scarfs.
My mom helped me make this one and you can check out her tutorial HERE. Oh and I got my mom to model it. LOL I promised close ups only.
Aren't the colors gorgeous!?! 
I am definitely making more of these! 
My mom has a really great blog (Pine Creek Style) that you would love. Make sure you check out her past posts and let her know I sent ya. If you love what you see, follow too! When she reaches 100 followers, she is giving away a beautiful set of jewelry made by her!

Visit the link here to read about the giveaway.
You could win this jewelry below.
Have a great day everyone. Be back here tonight to link up to the Create and Share Party!
Continue Reading ...

Thursday, February 2, 2012

Motivation Jars - A Tutorial

I found another great {pin}spiration project to do. 

Last week I saw some Motivation Jars on Pinterest. One said "Pounds Lost" and the other was "Pounds to go". The jars had marbles that you transfer as you lose weight. COOL! What a fun way to get motivated to lose weight. I have been working on losing weight myself and knew this was something I wanted to do. I found the original idea HERE.

I made mine with shorter, square shaped jars and used glass beads.
...Here are my supplies...
2 glass jars
small multi-colored glass beads
large multi-colored glass beads
letter stickers
mod podge
small paintbrush
motivational print out (image available below)
scissors
For my jars, I wanted to have something extra. So I made up some motivations in PS5 for my glass beads. I thought it would be cool to have a motivational word or picture on the beads. I even made the larger beads to use as milestones. 
I don't need to lose 100 lbs. but I made this for others to use. I know a few people who have lost 100 lbs or more and they would have liked to use these. So here ya go, for anyone who may like to use these.
Save the image below for your personal use only. Thanks.
 Once you have it printed out, just cut out each one to use on your beads. I left the circles on the image so you would have a template to go by. I cut them all inside the circle. Removing the black circle completely. Next I added some mod podge to the bottom of the bead, added my image and covered again with mod podge to seal it.
I did use all the images on this ONE page, but no more. There are 56 images on this page. If you want you can print out more of the smaller images and make more, or like I did, just add plain beads in to mix it up.
These are how mine turned out. I LOVE how they look!
Now when you move over your beads, you may get a cute image or a motivation. ;D All the larger ones, for the milestones, turned out great. I love that I can pull out that 5, 10, 20 lbs markers to show my progress. It feels great every pound you lose, but 5, 10 lbs and more seem to be so rewarding. Don't you think?

Why the LBS? 
Did you ever wonder why the abbreviation for pounds was LBS? I did, so I looked it up. LOL 

The abbreviation LBS is based on the word "LIBRA" A Libra was the basic unit of weight used by Ancient Romans. Similar to todays English Pound. The word in Latin means "BALANCE" or "THE SCALES".

Ok, back to the project. haha....next I added the stickers to the jars. I found this really cool black, silver letters. But once I got them on there, they didn't look right at all. I could barely read them with the beads in the jar. Here is what they looked like before I fixed them.
The beads look cool in there, don't they? Toot! Toot! 
I know, I'm tooting my own horn there. SORRY! ;D

So to fix my problem, I grabbed a black sharpie and started to color over the silver. It was not fun, but luckily the silver part came off. I took off all the silver off each letter. :( I really liked my letters.
The letters were still a little dim so I went ahead and touched them up with my sharpie. Much Better. Still not great. But we learn as we go right? And I am sure you will learn from me by not buying the wrong letters. HAHA!
Here is my final pic. I am happy with how they turned out and look forward to using them. YEAH! 
One other thing I changed was my "POUNDS TO GO" jar actually says "POUNDS TO LOSE". I just liked that better. 
The letters look crooked in this pic. They really are straight. :( sorry for the bad pic. Plus my counter doesn't help much. Kinda dark. Oops.

What do you think? Will you make some of these jars? If you need them, that is! LOL
Don't forget to come back tomorrow to link up some {pin}spiration of your own in our Pinterest Challenge Party.
Continue Reading ...

Tuesday, January 31, 2012

T-Shirt Scarf - Part 2

I'm back with another T-Shirt Scarf. 
Remember last week I promised a no-sew scarf. Well, I'm sharing it today! Stop by HERE to see last weeks!
Let's get right into it cuz I'm a little late posting. ;-)
Start off with a cute T-shirt. This is a smaller one of mine that I am making for my daughters. They have been wearing the others I made and asked for more colors. Too cute. But I usually use either a mens shirt or xxl for an adult scarf. You can pick them up at a thrift store to save on cost. Or if you're like me, save all your t-shirst and grab some that family and friends are throwing out!
I used another polka dot shirt. ;-D
Trim off the bottom and cut from arm pit to arm pit. Set aside the top of the shirt for later.
Fun part! Start cutting strips. Mine are just under 1" each. DO NOT cut completely off. Stop just short of the other side. Remember this is a NO SEW! Continue all the way across.
Close up of where you are NOT cutting.
Now you get to stretch out each strip to get that cute curled effect.
Now carefully separate the loops where you did not cute the shirt.
Before you gather that up, grab the top of the shirt and cut out a rectangle shape. About 2x6 in size. Then trim each end into a point. This is what you are going to use to hold together the gathered end of the scarf.
Now gather up the end that you didn't cut. 
Wrap the cut strip from the top of the shirt around the gathered end a couple of time and tie in a knot.
To get rid of the stringy ends, just tuck them under. And you have a nice finished NO SEW t-shirt scarf.
This is a really quick scarf. I had this one made in a matter of minutes. So if you need a last minute gift for someone, this would be perfect!
 Again, I added a flower. But it is just a clip on one. So you can use this scarf with or without one. Don't forget to double it up for another cute look!
I have more! Come back again next week for Part 3. I will be sharing another NO SEW scarf but with a completely different look! I can't wait to share this one!
Continue Reading ...