-
Showing posts with label Gifts. Show all posts

Monday, October 21, 2013

Beats by Dr. Dre Studio ~ Review & Giveaway

I was very excited when I was contacted by Staples to receive a pair of beats by dr. dre studio for review. My husband and I have been looking for a good pair of headphones for a while. We had heard {beats by dr. dre studio} were pretty nice and I couldn't wait to test them out.

While waiting for my headphones to arrive, I got a special lil surprise in the mail from my contact, Jessica. It was a Staples Easy Button. LOL I couldn't help but crack a smile. My life just became easier. YAY! My kids have since been pressing the button and the "that was easy" verse has been a regular sound here in my house. Although they were a little disappointed when it didn't make their homework magically get done! Gotta love that easy button.  Getting a {Lot of Laughs} over here! Thank you, Jessica!

. . . On to my review of these amazing headphones . . .
As soon as the headphones arrived I was impressed. Impressed with the packaging (yes, I loved the box it came in) quality, sound, carrying case and that I could use them for phone calls. I immediately put them to use. First we all (the kids and I) tried them out by listening to some music. The music sounded clear and precise. We all wanted to use them all night. When my husband got home he tried them out too. He said they were awesome and we got a kick out of him singing out loud. He even tried to steal them from me to take on the road. Nope, they are mine! LOL Ok, maybe I will share a little, but not just yet.
Next, I tried them out while making some phone calls. While they don't cancel out all noise (kids playing in the background) they do cancel it out enough so I can actually hear what the other person is saying. With other headphones I can still hear my kids and I have to stop and tell them to quiet down while I talk.  With these I don't have to at all.  I also worry about the other person hearing the kids in the background, but with the beats by dr. dre studio I don't. The microphone does a great job of canceling out the background noise.  I tested this out in the car, where it gets pretty loud sometimes and it passed.  I also want to mention that the transition from music to a phone call is smooth and when you hang up, it goes back to your music with ease.  

The earcups size and cushion make the headphones very comfortable to wear. They are just the right size for children, teens and adults. I do have to say though at the cost of these headphones, I myself plan on only my husband and I using them and possibly supervised use for the kids.  The headphones are durable and I think they would be just fine for kids use, but it's our preference to keep them for adult use most of the time. The headphone case is very impressive with its rigid construction. I didn't even know they came with a case, so I was excited to know I had somewhere to safely keep my headphones and cords all in one place. This case will keep your headphones safe and together when traveling too!
I would definitely recommend the beats by dr. dre studio to family and friends. They would make a perfect gift for anyone any time of the year. Thanks again to Staples and Jessica for allowing me to host this review.
The featured product {s} in this post were provided to me free of charge by the manufacturer or pr company representing the company. All opinions expressed in this review are my own and not influenced in any way by anyone. By entering this giveaway you agree to Trendy Treehouse Disclaimer/Terms of use.

Staples has generously offered to GIVEAWAY a pair of dr. dre studio headphones to one of my lovely readers. Valued up to $180.
(Headphones pictured below are just an example of what you could win. The winner will choose a pair valued up to $180 on Staples.com)
Enter this giveaway below.
MORE PRODUCT DETAILS - Courtesy of Staples.com

The original Beats that took the world by storm

After 25 years, Dr. Dre was tired of spending months on a track only to have his fans hear it on weak, distorting ear buds. Two years and hundreds of prototypes later, Beats Studio headphones are the icons that bring you sound the way it was originally intended.
  • VALID ONLINE ONLY, WHILE SUPPLIES LAST. REQUESTS TO MATCH PRICE IN STORE WILL NOT BE HONORED.
  • Powered by a pair of AAA batteries, the noise cancellation feature in a pair of stylish Beats Studio headphones amplifies the music as it blocks out noise, giving you consistently powerful and intense sound
  • Super plush and covered with ultra-soft breathable materials, you’ll be cool and comfortable even during marathon listening sessions. The Beats by Dr. Dre logo on the side also acts as a mute button when you press it. No need to take them off to talk.
  • Take calls, skip songs and adjust volume right from the cord of your Beats Studio headphones. No more searching for your phone or music player just to find the right song
  • A flawless and iconic fit. The perfect lightweight, foldable headphone that fits all sizes and shapes comfortably. The result is a design now copied by brands around the world.
  • Beats Studio on ear Headphones, Two (2) AAA batteries, 3.5mm audio cable, 1/4" audio adapter, In-line remote & mic cable (features may vary), Hard Shell carrying case, Beats cleaning cloth
"People aren't hearing all the music.

Artists and producers work hard in the studio perfecting their sound. But people can't really hear it with normal headphones. Most headphones can't handle the bass, the detail, the dynamics. Bottom line, the music doesn't move you.

With Beats, people are going to hear what the artists hear, and listen to the music the way they should: the way I do." - Dr. Dre


It's All About Sound
Three years of thorough research and development resulted in the most incredible headphone speaker ever built. Beats features highly advanced materials and construction to deliver a new level of audio accuracy and clarity. Combining extra-large speaker drivers and a high-power digital amplifier, Beats delivers an unprecedented combination of super deep bass, smooth undistorted highs, and crystal clear vocals never heard before from headphones.

Less Noise, More Music With Powered Isolation
Today's digital audio recording technology gives music more detail than ever before. Unfortunately, the details get easily lost in today's noisy world: on the street, on the bus, on the plane. The best listening experience isn't just about what you hear, but what you don't. Monster's powered isolation technology actively cuts external noise, so you experience all the rich details your favorite artists want you to hear.

Extreme Comfort is Music to Your Ears
With Beats, you feel the music, not the headphones. Spacious earcups give you extra room for a higher level of listening comfort. Plush ear cushions covered with ultra-soft breathable materials keep you cool even when the music's hot.

Ready for iPhone?
Stay connected without missing a beat. Beats comes with an additional Monster iSoniTalk™ iPhone enable headphone cable with built-in answer button and microphone so you can easily stop rockin' and start talkin'.


ADDITIONAL FEATURES:

Wired with Monster Cable
Advanced Monster™ Cable headphone cable with Quadripole™ 4 twisted pair construction reduces signal loss for balanced sound and clarity.

Micro Minijack
Compact connector design reduces bulk and eases unnecessary strain that can damage headphone connectors and ports.

Push To Listen
Integrated mute button lets you listen to the outside world without removing your Beats.

Folding Design
Beats fold into a compact shape for easy packing wherever you're going.

Touring Case
Rugged case with rigid construction keeps Beats and accessories safe during transport.

Monster CleanCloth
Ultra-soft cleaning cloth with AEGIS? microbe shield keeps Beats looking good and controls germs on your ear cushions.

Scratch-Resistant Gloss Finish
Advanced materials make Beats stand out from the crowd, and keep them looking good.


What's In The Box
  • Beats Studio headphones
  • Monster Cable headphone cable
  • Monster iSoniTalk™ iPhone enabled headphone cable
  • Rigid Tour case
  • Anti-Microbial Cleaning cloth
  • 1/8" to 1/4" Adapter
  • Two AAA batteries
One Year Limited Warranty

Specifications
  • Weight: 260 grams, 270 grams with batteries
  • Headphone cable length: 1.3 meters
  • Connector: 1/8 inch (3.5mm), gold-plated
Continue Reading ...

Sunday, July 21, 2013

Painting Party with Angelo DiGangi | Guest Blogger

Painting Party ñ Patio Style!

When it comes to hosting group activities with kids ñ whether you are celebrating your child's birthday with the entire class or barbecuing with the rest of the neighborhood ñ one of the hottest trends is throwing a painting-themed party.

Even if you just want a fun way to spend a Saturday with your own children, setting up a painting station on your patio is a sure-fire way to create fun for the whole family.

And the process from start to finish is relatively simple regardless of the number of participants you plan to invite. With that in mind, here are some basic guidelines to follow for maximizing the fun, highlighting the positive aspects of social camaraderie and keeping clean-up to a minimum.
Prepare for Success

The best parties are those that have been thought through well in advance of the guests' arrival. To ensure smooth sailing from start to finish, perform the following tasks beforehand.

Protective Measures

Even if you have the most spatially-conscious kids on the planet in attendance at your party, where there is an open can of paint, a knocked-over container is sure to follow. So to protect your outdoor patio furniture from those inevitable puddles, cover your tables and chairs with a plastic drop-cloth, a tarp or even on old sheet before you begin doling out the painting supplies.

Even if you have waterproof and weather-resistant outdoor pillows or patio cushions, due to the messy nature of this party, it's best to remove them entirely from the scene as opposed to tossing them off to the side. Place them inside the house, garage or even in outdoor storage bins with lids you may have on the patio for just such a purpose (or for storms, off-season storage, etc.).

Finally, no matter what you end up painting, when you set the item aside to dry, make sure to protect the surface of the table or floor with coverings such as newspapers or old magazine pages.

The Right Stuff

As in everything in life, projects are much easier if you have the right tools. For your painting party, there are only a few things to gather and you're good to go!
You'll need:
  • Brushes: Compile different sizes and widths ñ perhaps one larger and one smaller for each child ñ and place them in containers on the table or lay them out at individual seats.

  • Coveralls: Ask the kids to wear something they don't mind getting messy or have old t-shirts or smocks for them to use during the party.


  • Paints: Depending on what you decide to paint, there are types of paints that are better suited for certain projects. For example, puffy paints work better for decorating clothes (like T-shirts or shorts/jeans) and craft paints are good for items like flower pots.


  • In fact, let's stick with the outdoor patio theme and use hand-painted flower pots as our painting party project! For each child you'll need:
    • One terra cotta pot

  • One shovel (you can also use spoons in lieu of individual shovels)


  • Potting soil


  • Flower Seeds: you can set out several different varieties and give each child a few seeds of their choice or you can purchase individual seed packets and let them choose from them


  • Pint-Sized Picassos

    Now that you have everything you need, get out of the way and let their creativity take over!

    First, have the kids paint whatever designs they like on the flower pots. You might suggest they paint their names, or the names of their parents (if used as gifts), or even the type of flower they will be planting. Pets and sports themes are also great options!

    Once the pots are painted, place them aside to dry. Depending on your outdoor conditions, times will vary but just make sure they are dry to the touch before you move on to the next step.

    Once they are dry, have each child reclaim their pot and begin planting.

    Scoop potting soil into each pot and lightly pack it down to about 1 inch below the rim. Push your seeds into the potting mix to the recommended depth for the type of plant and gently cover them with soil. Water each pot before the guests leave and wish them luck with their newly-discovered green thumbs!

    What other ideas do you have for making sure you hit it out of the park with your next patio painting party?

    Angelo DiGangi, a Home Depot sales associate in the Chicago area, is a regular Home Depot blog contributor on outdoor decor projects and products. Angelo's interests range from providing homeowners tips on flower seeds to discussing the latest trends in outdoor patio furniture.

    Thank you Angelo DiGangi & Home Depot for being our Guest Blogger today!

    Continue Reading ...

    Thursday, May 9, 2013

    Mothers Day Ideas

    Today I thought I would revisit some my past gift ideas. These are perfect for Mother's Day! I also thought I would share some mothers day poems that you could use with them.

    Check out my handprint bouquet for a quick and memorable gift.
    I was also excited yesterday to get an email from Care.com. They shared my bouquet in their post for 27 Mother's Day Gift Ideas Kids Can Make. I am number 9 on the list, in case you want to check it out. ;D
    I loved making these, the Newspaper Flower Bouquet. This takes a bit more time, but so worth it when you see the smile on your mommas face.
    Handprint embroidery can be so creative and fun. Let the kids pic out the fabric and add their names to personalize it even more.
    These beautiful handprint Easter lily's were made by Jamie. I love these! 
    This lovely framed pin cushion was made by my mom at Pine Creek Style.  My kids helped and I arranged the pins in a heart for this photo. I wanted to keep it that way. LOL
    Decorative Fridge Magnets are fun too. I made these a while back to dress up my own fridge, but they would be great to give as gifts too!
    And now for a few cute Mother's day Poems
    (credits unknown)

    Mother's Day Poem #1

    I am small and it is hard to stay clean.
    I sometimes leave handprints in places I don't mean.
    On windows, walls and on the kitchen floor,
    The cookie jar, light switch or the refrigerator door.

    I am giving you this handprint,
    So when I get older, you can look back
    To a time long ago when I was small,
    And still see my handprints here on the wall.

    Mother's Day Poem #2

    Sometimes you get discouraged
    Because I am so small,
    And always leave my fingerprints
    On furniture and walls.
    But everyday I am growing,
    I'll be grown up someday,
    And all these tiny handprints
    will simply fade away.
    So here is my tiny handprint
    Just so you can recall,
    Exactly how my fingers looked
    When I was very small.

    Mother's Day Poem #3

    Everyday I am exploring
    Touching everything I have found
    I leave behind my little marks
    And handprints all around

    You clean up those handprints
    But someday when I am grown
    You will wish you just had one handprint
    To keep for your very own

    I made this handprint for you
    So that one day when I am tall
    You will remember what my hand looked like
    Long ago when I was very small

    Hope you all have a wonderful Mother's Day and that you enjoyed what I shared today! ;D
    To see how these gifts were made, just click on the colored text or the photo!

    What did you make for Mother's Day gifts this year? Please share on our Facebook page. Link below. Don't forget to like our page too!
    Please Check Out My Other Links Below
    I would love to have you like, follow, connect and chat with you more!
    tticon-pinteresttticon-facebooktticon-twittertticon-instagram tticon-etsy tticon-shop
    Continue Reading ...

    Thursday, May 2, 2013

    Fancy & Fun Headband

    I made this fun headband the other day for my girls.  It was easy to make and didn't take too much time at all.

    ...What you will need...

    Plastic Headband
    Ruffled Tulle
    Ball Fringe
    Flowers

    First start by hot gluing on the ruffled tulle.  Don't go down all the way to the end.  That is just going behind the ear and may be uncomfortable to wear.
    It should now look like this picture below.
    Next, glue on the ball fringe. I tucked under each end to help keep it from fraying.
    It's looking cute already. I think it would look cute just like this too. But today we added flowers.
    I would usually like to make my own flowers, but these pre-made flowers make this headband quick.  And they are pretty cute too!  Just glue them on and you are done. Probably only took you about 5 minutes to make.
    Here is my little model showing it off.  I have to say that we got pretty lucky in finding the dress she is wearing too. I made this headband thinking the colors would go with many of her clothes and then found this dress the next day while shopping. I couldn't pass it up.  She just had to put it on as soon as we got in the car. ;D  Our next stop was the grocery store and the cashier said she loved her outfit and especially the headband. She told her that she should sell them. We just might do that. LOL
    Share your version of this headband by emailing me at trendytreehouse@me.com or by linking below in comments. 
    Please link back to this post if you use this post. Thanks.
    Please Check Out My Other Links Below
    I would love to have you like, follow, connect and chat with you more!
    tticon-pinteresttticon-facebooktticon-twittertticon-instagramtticon-etsytticon-shop
    Continue Reading ...

    Friday, January 18, 2013

    Pay It Forward

    I am excited to be offering this fun "Pay it Forward" this year!
    I love the idea of making something and sharing it!
    ...please include with your email address...

    your mailing address, so I can send your gift
    some ideas of what you like (maybe some links on Pinterest)
    share a link to where you are Paying it Forward!

    Please remember to keep it small so my shipping isn't too high. I am sure you understand how high shipping can be.

    This will be fun! I hope that we can spread this around and share. Personal, handmade gifts are such a treasure!
    Continue Reading ...

    Thursday, November 15, 2012

    Signs By Andrea Review & Giveaway

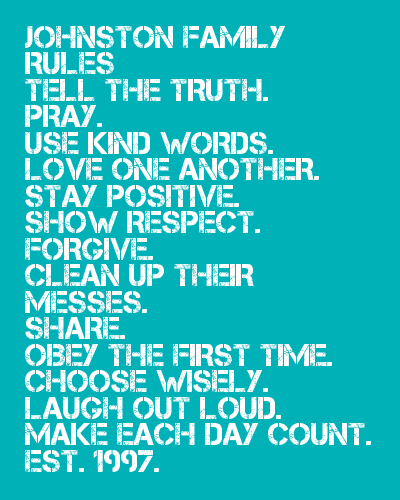
    I am very excited today to share with you an exciting site that offers instant custom signs for your home.  I was contacted by Andrea and asked to check out her "Customizable Family Rules Printable".  I have been wanting to make one for so long now and just hadn't gotten around to it.  So I was very excited to check it out! I immediately went to check it out.

    Look at what I customized for my "Family Rules"
    Isn't it AWESOME! I love it and it was so easy to make. Just visit the cool word builder tool HERE and start creating your own! You can add a bunch of rules that are ready to go or create your own rules! I added a couple of my own, but I loved the choices she had.

    I also think you will love the different styles offered too! The one I did above is style "Kitschy" I liked the look and I also liked the black background.  But there are so many other styles. 9 different styles to be specific.

    Here are a couple others I made up to show you.

    "Distressed Style"
    "Wallpaper Style"
    Aren't they cute!?! I knew you would love them! Another great thing about this tool is that if you don't exactly love the order of the rules, you can just click and drag them into the order you like. Very simple!

    If you need a little help learning how to use the tool, there is a video you can watch.  Click below to watch. You will be making one for yourself right away after you see how easy it is.

    Another great printable they offer is the "Special Dates" printable. It works just like the Family Rules, only you can add in your special dates. You can go to their Special Dates Artwork Builder to make yours. You can choose from 3 to up to 9 dates for your sign. For mine, I choose 8. I added in mine and my husbands birth dates, the date my husband and I got together, our anniversary and each of our 4 kids birthdays.

    It's really simple, just pick how many dates you want, then add in the dates, click on create my date artwork, select from 5 different styles, and then choose if you want to get a PDF or have it printed. It's so simple.

    I changed the dates, but this is the style I went with.
    I love it because it has a little heart with white letters for the date we got together. So cute!
    Here is another style I liked. A little simpler. I kept the same fake dates for this example. LOL
    Check out Signs By Andrea on Facebook & Twitter too! Don't forget to like her pages and let her know you found them through Trendy Treehouse! ;)

    Giveaway Closed - Winner will be emailed. 
    Thanks to all our entries here, FB and on Instagram.

    Have fun creating your Family Rules Printable!

    Thank you so much to Andrea for offering this giveaway and of course for my lovely printables! I printed them up and they are so vibrant, and well made. I can't wait to hang them in my house!

    You will have until  December 7 @ 9:00 p.m. Pacific Standard time to enter this giveaway. The winner will be chosen by random.org and announced here. If the winner has provided an email address I will contact you. If you don't provide your email, you will want to check back here and see if you are the winner. The winner will have 48 hours to contact me or a new winner will be chosen. This giveaway is open to those living in US only. You must be 18 years or older to enter. Thanks for entering at Trendy Treehouse. Good Luck and Have Fun!!

    By entering this giveaway you agree to Trendy Treehouse Disclaimer/Terms of use.
    Continue Reading ...

    Sunday, October 14, 2012

    Guest Post - Pumpkin on my Bumkin


    Hi, I'm Tricia from Made By Me. Shared With You, a little sewing blog that I try to keep up.  I'm excited to be here sharing one of my favorite projects, the Lil' Pumpkin appliqued bodysuit.  Being a mother of two little ones, I like projects that are quick, simple, and easy on the budget.  This little appliqued bodysuit can be made up during a nap time, and will have your little bundle of joy ready for Fall.
    I call it the "There's a pumpkin on my bumkin applique".  There are very few times in life when it's okay to have pictures or words plastered on your bottom, but the baby stage is one (if not the only) acceptable stage. Having boys, I don't get to indulge in ruffled bottom tights and bloomers, so an appliqued onesie will have to work.
    It's a simple little applique that I designed.  I'll share the file with you so long as you respect that it is for personal use only.  The template is designed to fit a pre-washed Carter's 0-3 month onesie.  You can feel free to adjust it to different sizes.
    My applique is done with some scrap knit fabric that I have had stashed away, heat and bond fusible adhesive,  some embroidery thread, and lightweight fusible interfacing.
    Begin by applying the heat and bond to the wrong side of the fabric.  
    Next transfer the image to the front side of the fabric using pattern marking/transfer paper. Cut out your pieces.
    Adhere the applique pieces to the onesie.  I had the small pumpkin in the front, and the large pumpkin on the behind.  It should fit right in line with the seams and snaps on the onesie.
     I used my embroidery thread to do some hand stitching.  I feel that it adds some visual interest to the applique.  You could do some machine stitching around the images if you prefer.  If you are using a fabric that frays (knits generally won't) you will want to ensure that you either satin stitch (tight zig zag) around the image, or apply some sort of fray check or fray block to the raw edges.
    Once I was done with the applique and hand stitching I used some fusible interfacing to secure the embroidery threads, and prevent the thread from irritating babies chest.
    That's it.
    A fun little applique for the season.

    You can find the template here.  Once again, the template is for personal use only.

    Thank you so much Tricia for sharing this adorable lil bumkin with us today! We loved having you.

    Please make sure you stop by and thank Tricia for sharing this with you. You can find her HERE.
    Continue Reading ...