-
Showing posts with label Accessories. Show all posts

Thursday, January 20, 2011

Simple Lamp Makeover

I bought some lamps and shades at Target for my girls rooms. All they had was white lamps and pink lamp shades.


They would be fine like this. But the girls wanted to add some ribbons. So here is what we did. The little girls room has pinks, blues, oranges and greens. They both picked out pink and blue for their lamp. Cha~Cha wanted Purple. She has pink in her room, but we will be painting purple walls to match her cute new bedspread. So she chose purple.


I hot glued the ribbon on both ends of the ribbon leaving the part on the shade somewhat loose. Sooooo.... the girls could do this (below) if they wanted. A place to keep their hair clips. 


It would also be fun to slip some pictures in there too! We may add some lace or beads to the bottom, but as for now we wanted something quick and simple.

Continue Reading ...

Thursday, January 13, 2011

Headbands from Men's Ties

I love to shop at this local antique store. I used to go every Tuesday. She has a variety of products from estate sales and storage units. I always admired all the men's ties she had. She used them as curtains. So cute! Well one day she closed up shop and moved it to her home town (about 30 min away). She was going to have monthly sales at her place. It didn't quite work out, so she opened up a new shop in town. When she called, I was really excited to be able to go there again.

I went by there last week and as I shopped around, we caught up on things. Then she mentioned the ties. I said, "Oh yeah! I was going to ask you about those." She said she had them in the back all boxed up. She hadn't  decided what to do with them in the new shop. Well I asked if she could make me a deal on the whole box. They were neatly packed in the box. So, so many of them. She made me a great deal and I bought them all! Heeheehee! I was so excited.

So trying to keep it short, LOL, I am going to be sharing some tie projects with you. The first just happens to be headbands. I think they turned out beautiful.


First I took the long skinny end and cut about 15-17". This was going to be the main headband. I also bought some elastic for the back. I cut two pieces at about 5" for each headband. I used the sewing machine for 3 of them. But I recommend hand stitching these. You get a cleaner look. Some of the ties material was just too slick. I just wasn't happy with the finish.

So the picture below shows the one I hand stitched. Love how much cleaner this looks. It did take a little longer to make, but it was worth it. I really love the flower on this one too! I made this one for a friend. Hope it fits cause I didn't get to measure her head. LOL


Here is a close up of a couple of the others. I made a pom flower for one and just added buttons to the other. Both are cute. The one on the right was a flower I cut off and old t-shirt of mine that I don't wear anymore. It turned out pretty darn cute too.


I think these look really cute in the girls hair. I snapped the shot below with my cell phone. It looked way cuter when I actually fixed her hair. LOL Although I love the elastic, in the future, I plan on making more that are actually attached to pre-made headbands. The girls requested them. HAHA!


I plan on sharing more tie projects in the future. So keep checking.
What have you made with ties?
Continue Reading ...

Sunday, July 18, 2010

Organic Island Lip Balm Review & Giveaway - closed

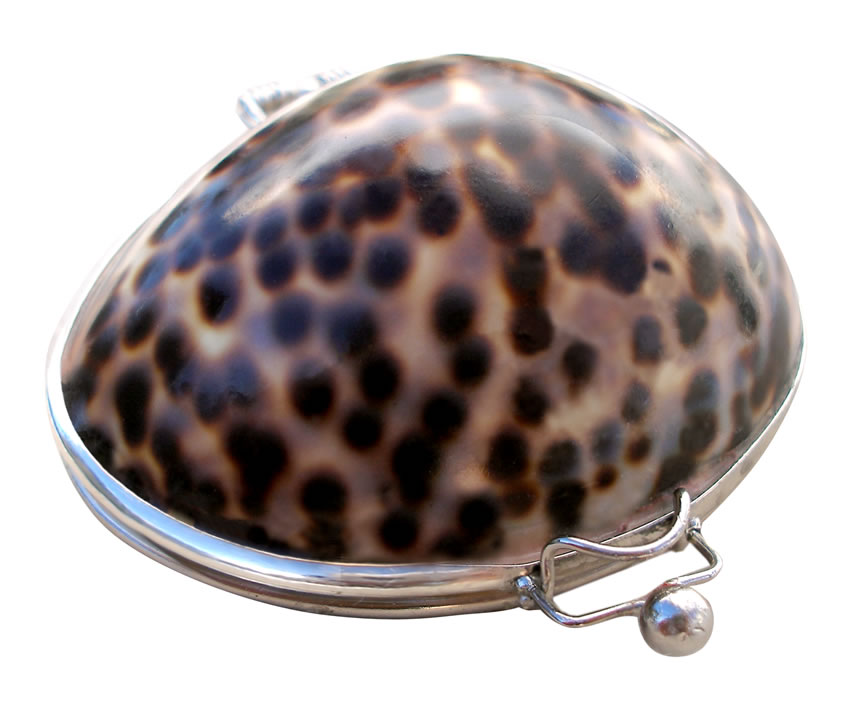
I was very excited to find out that I would be reviewing "Shell Lip Balm" from Organic Island. Each lip balm comes in a beautiful beach shell which makes them unique. All the shells vary in shape and colors. I will show you a few more up close below. I like that each lip balm contains a blend of 100% organic, natural Australian oils, plant & fruit extracts, fruit butters and Vitamin E. It has a smooth feel to it and smells great too! These shell lip balms fit nicely in any purse or pocket and even come with a cute drawstring bag. You can use the bag to keep your shell from getting scratched up or you can use it to gift wrap and give to a friend. Another fun thing I wanted to mention is when you open up your shell there is a mirror on top. Perfect for help when putting on your lip balm and for checking your makeup too! I like that once your lip balm is gone, you can still use the shell as a compact mirror. I will not be getting another compact again. These are just way too cute and stylish. You just have to get one for your purse. Although this company is in Australia, they do have heavily discounted postage for international orders and since they are so light in weight, postage wouldn't be very much at all. They will even give you an option to send this as a gift with a personalized tag. What a perfect gift to send someone who may not live near to you. To find out more of what you will get with your order, you can go HERE. There is a very detailed list of what you will receive. Did I forget to mention the price? Only $12.99 for one and that is  great for a trendy lil lip balm that can be reused as a compact too! I am very happy with my Shell Lip Balms and would recommend them to anyone. Thank you Organic Island for my beautiful Shell Lip Balms!


~ Some of their fabulous Shell Li Balms ~

 Their smaller shells are designed to fit in a small hand bag or purse. However the small shells do not have a MIRROR. I wanted to make that clear because I mentioned above that you can reuse them as a compact. So if you are looking for something small for a fun night out, I would get the smaller shell version. Of course, I myself would get the one with the mirror just because I love it! The Small Shell contains 3-6g of Lip Balm.
The medium Shells come with a mirror. Perfect for checking those lips and make up too! It also looks very stylish and your friends and family will beg you for one and ask where you got it. Trust me. I have some friends that think they are pretty fabulous! Each medium shell comes with 4-10g of Lip Balm. And don't forget that you can still use this shell as a compact when your lip balm is gone. Great Buy!

The larger shell is nice too! They are perfect for larger bag carriers and for keeping around the house. Surprise your guests when they use the powder room and find a beautiful shell that has a nice lip balm inside to use. Get a few of them to leave in different rooms of the house! These larger shells hold 8-14g of Lip Balm. A Super Value!
Organic Island is giving away to ONE luck Winner a....
3 pack of Shell Lip Balms Valuing at $50.00
Mandatory 1st Entry -Visit Organic Island & Comment below sharing with us what you like about their Shell Lip Balms 

Must enter Mandatory entry or all others will be deleted. Thanks! 

Additional Entries... Eligible after completing mandatory entry above. 
Please leave a new comment for each entry that you have done. Thank you! 


  • 3 entries for each - Like Organic Island on Facebook and Twitter - Leave a link in the comment
  • 3 entries - Add Organic Island to your Link List - http://www.organicisland.com.au/lipbalm/
  • 10 entries - Buy a Lip Balm from Organic Island
  • 2 entries - Comment on Organic Islands Facebook about this giveaway including @TrendyTreehouse
  • 4 entries - Subscribe to Trendy Treehouse via Feedburner
  • 2 entires - Vote for Trendy Treehouse in the Top Mommy Blogs
  • 4 entries - Follow Trendy Treehouse via Google Friend Connect
  • 3 entries for each - Follow Trendy Treehouse on Facebook & Twitter
  • 2 entries - Follow Trendy Treehouse via Network Blogs
  • 1 entry daily for each - Blog, Tweet & Post about this giveaway including @trendytreehouse & @organicisland


You will have until  August 1st @ 9:00 p.m. Pacific Standard time to enter this giveaway. The winner will be chosen by random.org and announced here. If the winner has provided an email address I will contact you. If you don't provide your email, you will want to check back here and see if you are the winner. The winner will have 48 hours to contact me or a new winner will be chosen. This giveaway is open to those living in US, CANADA & AUSTRALIA. You must be 18 years or older to enter. Thanks for entering at Trendy Treehouse. Good Luck and Have Fun!!

The featured product {s} in this post were provided to me free of charge by the manufacturer or pr company representing the company. All opinions expressed in this review are my own and not influenced in any way by anyone. By entering this giveaway you agree to Trendy Treehouse Disclaimer/Terms of use.
Continue Reading ...

Thursday, June 24, 2010

Book Paper Wreath Tutorial

I was browsing through youtube and found this great video on how to make a paper wreath out of old book pages. I loved it and knew I had to make one. If you want to see the video just go to THIS link. It is a easy tutorial and she is funny too!

There are other paper wreaths out there I found too that I would like to try, but this was tops because I had the supplies already. LOL So heres what ya do....
Some items you need aren't in this picture. Sorry!
What you will need...
  • Old Book (I found mine at a thrift store for $2)
  • Square wooden or foam core board
  • Scissors
  • Tape
  • Stapler
  • Pencil
  • Hot Glue Gun
.... How to make this ....

First, you want to start off my getting all your book pages ready by cutting (tearing them) out of you book. I said tearing because it is much quicker than cutting. Usually the paper is easy to get out.  Just cut back the book cover and pull the papers out. Some books are glued and in my case they were glued and tied with string. But still very easy to get out. Before I forget, since this wreath was intended for my daughters room, I used a kids craft book. I wanted bits of color to pop out. But if you are making this for your living room or any other place in the house, you can use a regular book. This wreath is larger also because the book was extra big. You can still use the same measurements with any book size. You will see what I mean about measurements below.
Once you have all the papers out of the book, its time to cut the glued edges off. I used scissors which took a little while. I couldn't find my paper cutter. Which would be much quicker. So I recommend that you use one. 
Now comes the rolling of the paper. LOL This takes time, but is so worth it when you see the final result. And by time, I don't mean a whole lot. It only took me about 40 min (including stopping to help 7 kids, it was a play day. LOL) If you have lil hands willing to help, be sure to enlist!
Take your paper and roll one corner towards the other side while curling under. It will look like the photo above. Fold the remaining paper over the top. Just keep rolling back to make a cone shape.

Once all the way rolled back you will want to take a small piece of tape to hold it into place. I used regular tape but you can just as easily use double sided tape if you wanted to hid the tape. I didn't worry about it. For one, I did not have the tape along with all the other supplies and I knew that I wouldn't see it once I put the wreath together. 
Once you have your cone taped, staple the bottom of each cone about 1 inch above the bottom. Again, you really don't have to be that accurate. Mine were definitely not all 1 inch. I had lil hands helping me. I would much rather have them help than be perfect. LOL They love crafting.

Keep making your cones until you have a huge pile. Sorry, I wasn't thinking of counting each one. But you will need quite a bit. I used half of the book pages from my book. 

In between all this cone making, my son grabbed us a snack. Sesame sticks. mmmm! He said, "Mom, these would make great snack holders!" So you know what we did. YEP! We used a couple to hold our snacks. LOL KIDS! They sure are smart lil stinkers. I thought this was cleaver and had to share because you never know when you might need something to hold a treat. If you don't have a bowl, grab a magazine or piece of paper and roll up into a cone for a snack holder. Just tape these. No need for staples. Then just throw in the recycling bin when done or reuse again and again.

It's time to make the wreath. YEAH! This part is fun!

Get out your square board or foam core (I had the board already) Trace an 8" circle, 4" circle inside the larger circle, then a dot in the center of the board. My circles are not perfect. They are just there to give you an idea of where to place your cones.
Then start by Hot Gluing a cone to the 12 o'clock, 1, 3 and 6 o'clock positions. This will be your starting point to follow your wreath shape. Make sure the open end of the cone is facing up before you glue it down.

Continue to add your cones to make a full circle. It's looking beautiful already. Don't you just love all the color popping out from the craft book pages.

Start your second layer the same as the first by starting at 12, 1, 3 and 6 o'clock. When you glue your second set down, make sure you go in between the first cones so you will end up covering the board. As you can see from the photo above, the cones do not have to be perfectly aligned. You will fill in areas as you go to cover all bad spots. See below... look how great this is looking with just two layers.

Again, for your final layer start with 12, 1, 3 and 6 o'clock. Then just keep glueing around until you have your desired look and covering up any parts of the board that may be showing. The picture below shows the finished third layer. Love it! So pretty.

On the video I watched, she used small ornament balls and buttons to fill her center. I wanted something different to complete this so I made my own paper flowers for the center.

Take one sheet of paper and cut in half. Fold the one half in half. Then cut strips down the whole side of the paper. Don't cut on the folded edge, you want this to stay in one piece. Once you have the whole piece cut, fold back the two paper in opposite directions making your petals. I just folded them quickly by using the edge of a table. Roll the bottom using the table and roll the tops back after that. The bottom row will now be out of your way. Pretty easy. I tried it one at a time and that was too time consuming.

Once all the papers are curled back, just roll your strip into a flower shape. Secure with tape. Shape into the flower shape that you like. You will want to make 8 of these for the center of your wreath.

Glue all 8 to the center of your wreath. Start by gluing 7 paper flowers into a circle, then add your final paper flower to the center to complete it. Shape the paper if you need to.
Glue on a wall hanging bracket and you are all done. Ready to hang and enjoy.

Here is our completed wreath. We love it! I already have people requesting them for their homes. Phew!

FYI.... My son helped me assemble this whole wreath. I added the glue and he did the rest. He did a great job, don't you think. I made all the cones of course. He thought that part was boring. LOL. But thought I would tell you because this can just as easily be a kids craft as well. 

Tips and Tricks... 
  • To make this a smaller wreath, cut your book pages in half. Make two layers instead of three.
  • Afraid to use a book ~ use a magazine or newspaper. Or just get an old book that had been worn out (papers missing or torn)
  • Find some old music sheets that are unusable. That would make a beautiful wreath.
  • Use wrapping paper or colored paper.
  • Fill your center with buttons, rubber bands, hard candies, flowers.... Be creative
  • Make themed wreaths for holidays or birthdays
  • Add ribbons and flowers to embellish your wreath.
  • These would make amazing gifts for anyone.
Hope you enjoyed this tutorial. Please share with me what you did with your wreath. I would love to share your photos in this post as well. Have fun making yours! We did!
Continue Reading ...

Monday, June 14, 2010

Z2Wear Review

Z2Wear is a hip place for high end girls clothes. You will find rompers, tunics, dresses, shirts and messenger sacks. These clothes are so chic looking. Any girl would love to own these hip girls clothes. Not only are they cute for girls, you cool moms will love them too!

The Z2 wear girl has her own little twinkle before she truly shines! The new Elite Collection takes inspiration from that belief.
I was so lucky to be able to review one of Z2Wears Z2 Sack. I love it as much as my girls do. They are quite old enough to use it so I get to. They just think it is so pretty. LOL We have been using our sack every chance we get. It can be used for so many different things, I know you will love it. So far we have used ours for keeping my business supplies close at hand, taking swim suits to a friends for a day by the pool, sneaking candy into the movies (shhh, don't tell, LOL) and taking toys and books into dinner to keep the kids busy. My friends daughter (15) even borrowed it for a day out with her friends. They all loved it and wanted to know where they could get one. Before I forget, the Sack we got was called "Shark Skin" It is a beautifully made shiny blue fabric with hot pink stitching and has the cool Z2Wear Logo on one of the pockets. This sack along with the clothing line will have your teens and tweens happy. I definitely recommend checking into Z2Wear today!
Check out more by Z2Wear....

What girl wouldn't want this Tunic! This is Z2Wears "Garden Paisley Tunic" I love the teal and charcoal pattern. This top is made from 100% cotton with a mandarin collar, placket front and ruffles with deep cuff. It will be available this August. Set your sights on this now because I know it will go fast. 
This "Juliet Romper" is so cute. It is shown wearing over the Garden Paisley Tunic. What great combination. This is also made of 100% cotton and is sleeveless with great ribbon detail. Just as cute with out the tunic underneath. This will also be available this August. Start writing down your wish list.
Oh My, check out this adorable "Scottsdale Jumper". This is made of Indigo Stretch Denim and is also 100% cotton. It has pleated w/crystal patch pockets and a top stich faux belt. This lil romper would be cute for any occasion. Dress it up with one of their adorable tunic and messenger sacks for fun day out. 
This is another great "Messenger Sack" that I had to show off. I love the striped pattern and the embroidered touches. The crystals add a beautiful finish as well as their adorable logo. Use the saddle strap to easily carry this to work or play.
Don't forget to check out Z2Wear on  
"FACEBOOK"

Things that I love....

  • Absolutely adorable designs
  • Excellent Quality
  • Beautiful fabrics used
  • Fun for tweens, teens and moms
  • Clothes that can be worn for fun or play
  • Useful Messenger sacks that are fashionable too!
  • These Preteen clothes make a great gift
The featured product {s} in this post were provided to me free of charge by the manufacturer or pr company representing the company. All opinions expressed in this review are my own and not influenced in any way by anyone. Trendy Treehouse Disclaimer/Terms of use.
Continue Reading ...

Monday, May 17, 2010

Hair Accessory Frame Tutorial

I made this adorable Hair Accessory Frame for a good friend on mine. She just had her baby this week. Congrats Jenn! I will be delivering it soon.
What you will need...
  • Frame (whatever size you like, but larger is best for space)
  • Can of spray paint ~ I chose this color to match the lil ones room
  • Blocks (in this case I used pipe let over from hubby's job)
  • Sand Paper (Fine)
  • Scrap Fabric (large enough to cover the inner frame)
  • Blanket Batting (a little smaller than your fabric)
  • Staple Gun
  • Buttons
  • E6000 or Hot Glue Gun
  • Paint Pen (colors of your choosing)
  • Embellishments
How to make this...

First,  take the back off your frame. Place the frame on your blocks (these pipes came in handy, so if you have them, use those instead). This makes it easier to do your painting in 1 step. You can get all the outside and inside sides easily too!
Grab your spray paint and start spraying away. With this particular frame I wasn't worried about covering it completely. You'll see why in a second.
Once dry, take a fine piece of sand paper. Lightly sand the edges and sides. Rough it up a bit! I like the worn look. If you don't, you can skip this part. See below how cool it looks. LOL
Now your ready to go indoors and have some fun decorating. Take your blanket batting and cut to fit the inside of the frame opening, set aside for now.
Now take your fabric scrap and cut it to the size of the whole frame. You want it larger so you can fold it over and attach it to the back. But don't do that just yet. We need to add ribbons. Make sure you place the fabric over the batting. The batting is to give it a little extra lift and softness to the board.
It's time to lay out your ribbons. I used a variety of ribbons so I could give it a lot of color. Make sure you line it all out how you want them because your next step will be tacking them down.
Carefully turn over the frame so it is face down. You don't want your ribbons to fall out of place. Now grab that staple gun and tack down your fabric, making sure you get all the ribbons too! Trim excess fabric and ribbon. Don't worry about how ugly it looks, you can cover the back with a trim piece. I like to cover the whole thing. Once these are made, you won't take them apart anyway!
Now you want to use either a Hot Glue Gun or E6000 (I used E6000) and glue the ribbon to the fabric. You only want to glue the ribbons where they meet. See where the tip of the glue cap is. Glue those two ribbons down.
Now you get to pick some cute buttons to glue on top of the spots you just glued. You can use large, small and shaped buttons.
Finally, just embellish your frame with paint pens, flowers, a name, ect. I used scrabble pieces for her name and some newspaper flowers that I had made recently. Don't forget to cover the back of your frame with a large, thin piece of wood. Just tack or glue in place. Add a wall hanger and you are ready to hang and keep some cute hair accessories.
I think this turned out very cute!
I'd love to see your pictures, if you have made one of these! Send them our way and we will link them up to this post!


Continue Reading ...