

I am probably not going to tell you anything new in this post.
If you've been around the crafting community long enough,
then you already know how to do this.
But for the two of you who've heard of "freezer paper stenciling"
but haven't seen the countless tutorials out there,
(I won't make you raise your hand)
this ones for you!
What you need:
Fabric, freezer paper, exacto knife, stencil (computer print out),
paint and an iron.
Print out what you'd like to put on your fabric.
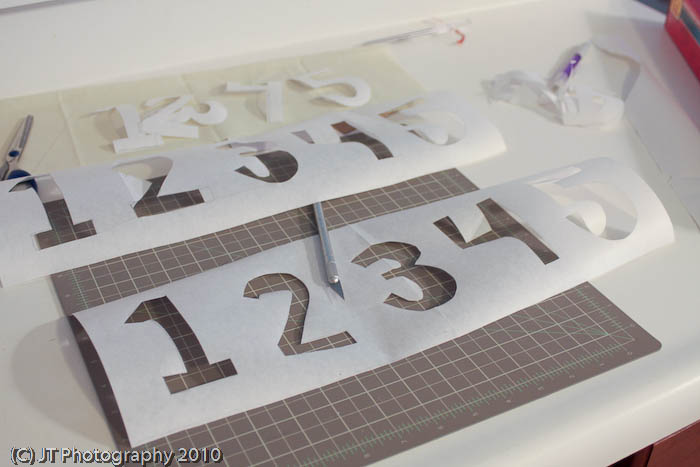
Then tape some freezer paper to a cutting mat
(make sure the shiny side is DOWN)
and then tape your print out over that.
Using your exacto knife cut out the stencil (what you want painted). Some people put the print out under the freezer paper,
I just like to put it on top! Then just iron the freezer paper to your fabric.
Make sure to go over the edges a couple of time and make sure it's all sealed!
 All you have to do now is paint...and paint and paint.
However many layers of paint is up to you,
I usually do at least two!
 Once the paint is dry peel off the freezer paper
(or if you're like me, just take it off once you're done painting,
because you can't wait to see how it turned out,
and then let it dry).
I decided to outline this one with a sharpie but you most
certainly do not have to do that.
I had a few blotches so it helped cover my mistakes.
 Come back next week and I'll show you what I used this
freezer paper number fabric for!

If you've been around the crafting community long enough,
then you already know how to do this.
But for the two of you who've heard of "freezer paper stenciling"
but haven't seen the countless tutorials out there,
(I won't make you raise your hand)
this ones for you!
What you need:
Fabric, freezer paper, exacto knife, stencil (computer print out),
paint and an iron.
Print out what you'd like to put on your fabric.
Then tape some freezer paper to a cutting mat
(make sure the shiny side is DOWN)
and then tape your print out over that.
Using your exacto knife cut out the stencil (what you want painted).
 Some people put the print out under the freezer paper,
I just like to put it on top!
 Then just iron the freezer paper to your fabric.
Make sure to go over the edges a couple of time and make sure it's all sealed!
 All you have to do now is paint...and paint and paint.
However many layers of paint is up to you,
I usually do at least two!
 Once the paint is dry peel off the freezer paper
(or if you're like me, just take it off once you're done painting,
because you can't wait to see how it turned out,
and then let it dry).
I decided to outline this one with a sharpie but you most
certainly do not have to do that.
I had a few blotches so it helped cover my mistakes.
 Come back next week and I'll show you what I used this
freezer paper number fabric for!
i feel really dumb asking this question, but what is freezer paper and where do you buy it?
ReplyDeleteLet me answer for you....
ReplyDeleteBecca, freezer paper is found in the section where you find the foil. If you've ever purchased meat or or fish in the butcher section of your grocery store, they use it to your wrap you selection in...I hope this helps.
Now my question. Are we ironing the dull or the shiny side face up or down?
I remember doing this years ago as a kid and haven't tried it since. I might have a new project! :)
ReplyDeletelove all of this stuff but no head to do alot of crafts. have a good day.
ReplyDeleteI've seen all the tutorials, but not one that said which side to place the paper-thanks! I probably would have ruined the iron! :P
ReplyDeletewow.. This is totally new to me too. Never heard of this way of stenciling before. Sounds like something I must try!
ReplyDeleteThanks
Lisa
Iron the shiny side down!! Glad the tutorial helped and that some of you were able to get new ideas!
ReplyDelete