-
Showing posts with label storage. Show all posts

Monday, January 27, 2014

Pack'n Up Christmas

For years, before storing Christmas items, I covered my Christmas trees with a plastic paint drop cloth & an old sheet. This year I decided to shrink wrap the Trees...
This idea worked great! I left some of the larger ornaments, decorations and garland on the tree. I packed anything that was delicate or glass. I figured that next year, I could change or add as I set up & decorate. Here is what I used & how:

  •  Plastic paint drop cloth; Cover the trees and tape in place. This will protect your items left on the tree. *Items won't stick to the plastic like they will with the shrink wrap. The plastic drop will preserve your items in mint condition.
  • Shrink Wrap; Wrap the tree from top to bottom. I actually started in the middle of the tree and worked up and over the top of the tree. Then I wrapped back down the tree, continuing down to the bottom. Cut wrap if needed, where you need. What is awesome about the shrink wrap, is you can stretch it to tighten the wrap & secure without using additional tape. It sticks well to itself. I also went under the tree to in close the bottom boughs.
  • Scissors & tape, use as needed
  • Cover the tree with the wrap by overlapping the layers. This will make a stronger cover.
  • Next year, simply cut the shrink wrap off and throw away. Straighten & rearrange your tree as  desired.
Just a note: Our trees were easier to move out the front door to the garage, due to the shrink wrap. The tree was tightly contained within the wrap. It was smaller in circumference, allowing it to fix through the front door with ease.  A Big Plus...My trees are 8 & 9 feet tall, one skinny, one fat!

Next year I can leave the same garland on the tree or change to a new look. In any case, I would rather redecorate next year than totally " un" decorate now!  

Simply Pack'n Up Christmas with Style...
Continue Reading ...

Saturday, August 11, 2012

Craft Supply Organization

Do you have one of these (spice rack) taking up space, barely getting used? We got this for our wedding (almost 10 years ago) and have barely used any of the spices. The rack was on the top of my kitchen cabinets if that tells you anything. I did some research on spices to see how long I should keep them. I found out that if the spices have no fragrance when crushed then they probably aren't very good. Plus I had new bottles of spices that I used more frequently in my cabinet where I could actually reach them. SOOOO, instead of just getting rid of the spices, jars and spinning rack I decided to re-purpose the whole thing. 

I emptied the jars, washed them out, took off the labels and got to work filling them up with crafty goodness. Think, buttons, sequence, safety pins, glass beads, the options are endless really. I sorted my buttons by color for the top jars and then added my little headband making supplies to some of the bottom jars. I added random little supplies to the extra jars and now I've got a great little spinning craft rack! I LOVE it and it's SOO helpful to me. No more dumping out the WHOLE jar of buttons just to find the right RED one, etc.
I never really got a good picture of the "finished" product until I snapped this one with my phone while crafting the other night. It works great for me while making headbands and I don't even miss the spices that used to fill those jars!

I know I'm not the first person to do this...just thought I'd share it so those of you who maybe haven't seen it can get to work re-purposing your old unused spice rack. Think outside the box, there are lots of things that would make GREAT craft storage units!!
 
Do you have a crazy big ribbon stash? I know there are TONS of ways to store ribbons and I've seen a few lately that I really love...however, I don't have a lot of space so most of those cute, creative ways don't work for me. My craft "room" is a corner in my master bedroom and I already get in trouble for the amount of "stuff" I have so I'm trying to make the crafts disappear and not take up more room, or be displayed... someday maybe!

Anyway, I had all most of my ribbon spools stored in a clear shoe box. It worked for the most part but I felt like it was just taking up too much space. Again, this method of storage is not original to me, but I can't remember where I saw it the first time. I took a package of clothespins and wrapped the ribbon around a clothes pin. Clothes pins take up a LOT less space than those big cardboard spools do. So I wrapped all my ribbon on the clothes pins and then put them in a large (emptied) twizzler bucket. They now take up 1/2 the space and I have a free clear plastic shoe bin to store other bulkier items in. I need to get a few more clothes pins so I can get ALL my ribbon in one place but it works great and I can easily see and get to whatever ribbon I need!!
Look at the difference in space that the ribbons take up. 
Plus, I think it looks cuter this way too!
I would LOVE to see some of your craft supply organization...as I said before, I have a small space so I need some good space saving techniques!! PLEASE SHARE! Link up your craft organizational techniques in the comments!!

Tomorrow I will be 32 weeks pregnant!! So excited to meet this new little lady...but SO much to do before she gets here! Hopefully the nesting will kick in full force once the big kids are in school and I have a little more time (and hopefully energy) to get the list accomplished!!
Continue Reading ...

Sunday, March 18, 2012

Empire Patio Covers Announcement & Giveaway

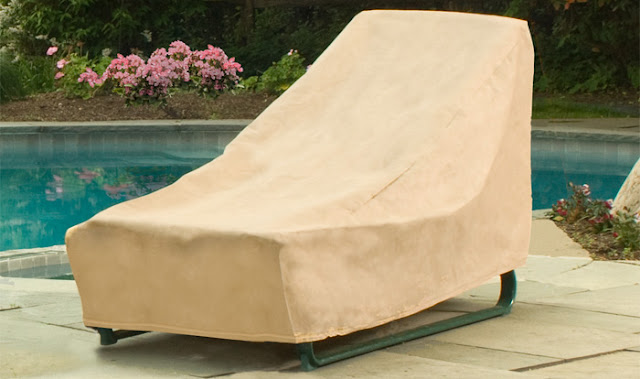
Trendy Treehouse is happy to announce Empire Patio Covers. A perfect way to protect your Patio Furniture with Style! Many covers and styles available. Covers available for chairs, tables, bbq's, fire pit, fountains, pet seat covers and more. You can even shop by collection with three beautiful collections to choose from. Read more below.
Some content in this post was taken with permission from Empire Patio Covers.
Choose Empire for Style
Empire outdoor patio furniture covers are the perfect combination of style and protection. Available in coordinated designer collections, our outdoor patio furniture covers offer all-weather outdoor protection and style at a discounted price.
Quality Outdoor Furniture Covers
Empire's outdoor patio covers can protect a variety of outdoor furniture pieces and accessories, choose from a grill cover or BBQ cover, to wood patio chair cover, to a wood patio table cover, to an umbrella cover! All of Empire's outdoor patio furniture covers feature an eco-friendly dioxin free coating and a positive air flow venting system to ensure the ultimate protection of your outdoor patio furniture against mold and mildew buildup.
Durable Patio Furniture Covers
Double stitched seams ensure long lasting outdoor patio furniture covers and a strong UV defense will keep the outdoor patio furniture covers looking as new as your furniture. All outdoor furniture covers also come with a dual attachment strap and buckle system to secure the outdoor furniture covers in place, even in windy conditions. All outdoor patio furniture covers feature a 1 or 2 year manufacturer's warranty.

EASY MEASUREMENT DIRECTIONS

If you're not sure exactly how to measure your furniture, use our guides! Download PDF HERE. Empire Patio Covers offer handy instructions and illustrations for whatever type of furniture you have! Make sure that you're getting the right sized cover by carefully measuring your furniture, and comparing them to the dimensions list for sizes.
Shop by Collection HERE. Classic Nutmeg, Metro Brown or Hunter Green.
{ENTER THE GIVEAWAY} 
Empire Patio Covers is offering a fantastic giveaway to my readers!
$75 to one very lucky reader.
HOW TO ENTER
First...remember to enter 1 comment per entry and include your email so we can contact you if you win.
First Mandatory Entry...Visit Empire Patio Covers and share what you love about their covers and what you would choose if you won.

Additional entries...to be completed after mandatory entry.
Follow Trendy Treehouse via Google Friend Connect
Follow Trendy Treehouse via Linky Followers
Follow Trendy Treehouse on Facebook
One entry per item...share about this giveaway on your Blog, Facebook or Twitter accounts. Leave a link including @TrendyTreehouse and @EmpirePatioCovers

You will have until  April 1st @ 9:00 p.m. Pacific Standard time to enter this giveaway. The winner will be chosen by random.org and announced here. If the winner has provided an email address I will contact you. If you don't provide your email, you will want to check back here and see if you are the winner. The winner will have 48 hours to contact me or a new winner will be chosen. This giveaway is open to those living in US only. You must be 18 years or older to enter. Thanks for entering at Trendy Treehouse. Good Luck and Have Fun!!
By entering this giveaway you agree to Trendy Treehouse Disclaimer/Terms of use.
 
Continue Reading ...

Sunday, May 2, 2010

♥ Guest Blogger ♥

Your going to Love this weeks "Guest Blogger"
Michelle at
DillyDallyandFlitter

They say necessity is the mother of all invention. 
or at least creation. 
maybe modification. 

I am continually on the prowl for something new to re-create and re-purpose. and it's super bonus if it is from items I already have that might otherwise go to waste!
Sometimes I can make up something new, and other times I modify and tweak already discovered ideas to be what I want and need them to be to make my life easier and more efficient.

After having my three miniatures, I could no longer keep track of my head, much less my keys- so research, the need for 6 extra hands and the Dangle Bangle was born {Dangle Bangle: a stylish way to keep my forever disappearing keys right on my wrist}!   But of course the head keeps spinning for new stuff to make and do….and to keep track of all of it, the blog was born in January 10.   

I am so inspired by the creative bloggers, and small business owners out there, and so happy they share their talent and skills.  So much of the desire to create comes from the inspiration from others that create.  That's what makes this blogging underworld so unique and such a treasure!  There are new ideas and new friends every day.

I am a generally happy girl and try to find the perfection in the imperfection… and in the noise these boys make!   You never know what's just around the corner! It's true… you  never know what's just around the corner!  To me, those are words to live by!

Enjoy!


Water Bottle Storage... Really? Awesome!

Bottles are everywhere... I hate them.  I walk into the pantry and look at so many items that are in plastic bottles.   Now it's time for them to move on UP{cycled} to hold something else... and it's really so easy!
Cut off the bottom of any narrow mouth bottle.
(I save the bottoms too... they make the best little mod podge or paint trays).
Next dig up some corks around the house... or if you don't have any... get busy drinking!  I used my hand held straight edge razer to notch a star shape into the end.
I then pushed my peg hook into the cork (much easier with the star cuts! trust me!)
Here is your hook with it's cork addition.


I decided to dress up the ends  and attached a 1.5" grosgrain ribbon... (fabric would be great too!)
Insert the hook into the bottle mouth. 
OR you can attach the hook to the pegboard and then push the water bottle onto the hook with cork. 


This one is a 8 oz. Coke bottle (perfect for smaller items).
Here I used (left is the 8oz coke).  middle is a coffee creamer bottle (note it's a milky bottle not clear) and right is a water bottle (no ribbon attached).
I love the plain one... I cut the bottle along the natural wave of the grooves on the plastic.
Sit back and enjoy your new storage and be happy that there are a few less bottles cluttering the landfills...
Thank you Michelle for stopping by Trendy Treehouse. We love your project!
Continue Reading ...