-
Showing posts with label Holidays. Show all posts

Friday, November 22, 2013

Thanksgiving Dinner is Ready...


A Moist Traditional Turkey...&
 There's a Duck in the OVEN
This turkey is very moist.
 My cooking secret makes all the meat moist and tender.
 This turkey was cooked in our smoker. We love the flavor the smoker adds to the taste. I love having my oven is free for all of side dishes.
 Rinse and prepare turkey. Oil the skin with garlic infused olive oil. Coat/sprinkle the outside (of the turkey) with Garlic pepper, Parmesan herbs, Worcestershire pepper and White pepper.
Place inside the empty cavity a FROZEN CUBE OF BUTTER!
Yep, that's my secret!  It melts slowly and helps tenderize the meat, leaving a slight buttery taste. 
*IF YOU WANT TO COLLECT THE JUICES FOR GRAVY, PLACE THE TURKEY IN A FOIL ROASTER.
*I don't care for breast meat, BUT I love to eat this white meat!
 Next, place a quarter of an peeled onion in the cavity with the butter.
 Add 3 cloves of garlic.
 Fold and close the turkey opening. We used small wooden skewers.
Cook on medium or about 300 degrees for 3/12 to 4 hours. Temperature inside the meat should reach 160-165 degrees.  Let rest for 20-30 minutes before carving.
Tastefully good, moist turkey and a happy tummy...
WHAT MORE COULD YOU WANT?
"See the duck recipe below"
NeeCee Signature
Just Ducky...
 Rinse and ready the duck. Do NOT oil. Duck has a lot of natural fat.
 Baste the outside with a sauce of your choice. I used an apricot pepper sauce.
Sprinkle with garlic pepper, inside and out. s
Stuff the duck with 1/8 of an onion and a couple of garlic cloves.
 Secure the duck with skewers as shown.
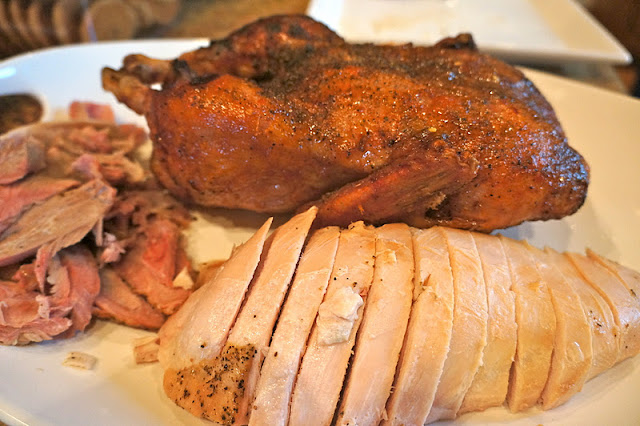
 We cooked the duck in the smoker at 350 degrees for 2 1/2-3 hours. reaching 160 degrees for cooked meat temperature. Let rest for about 15-20 minutes before carving.
All Photo's belong to Pine Creek Style by NeeCee
Turkey & Duck ready to serve....with Style

Have a Happy & Healthy Thanksgiving Everyone...
Continue Reading ...

Saturday, July 6, 2013

Bleach Pen T-shirt tutorial

I've shared the freezer paper stencil tutorial before and I LOVE a good freezer stencil painted shirt with clean edges, not much mess and quick turn around time. But some shirts call for a little more spontaneity...a little more blurred edges...a little easier prep (albeit with a longer wait time).

The bleach pen shirts are so easy to do, you just have to wait a while for the bleach to work...
I have used bleach pens on shirts in the past...
and this one...link on the picture.


Those were pretty easy to do since I just made straight lines with no significant design. I knew I wanted Micah to have a flag on his shirt since the girls had a flag on their shirts so I was trying to figure out the easiest way to make that happen. Of course freezer paper stenciling came into mind and while it always turns out great it's kind of a long process with having to cut everything with an exacto knife (because I'm not cool enough to have a silhouette machine that would cut the freezer paper for me) so I decided that I'd use the bleach pen. At first I couldn't figure out the best way to make sure the flag actually looked like a stencil. But then I remembered how I would get my scripture verses onto my paintings so I could paint the words in a way that was actually legible. So...here's how I did it...

I printed out the flag stencil that I wanted to use. I got my stencil from here. Then I colored on the back of the stencil with some colored chalk (sidewalk chalk totally works if that's all you have on hand). Then (with a piece of cardboard inside the shirt) I just traced over the stencil and the chalk was left on the shirt where I traced! This method also works on canvas (that's why my scripture paintings come out just like the font most times :)...my secret it out!).


Then I just traced over the lines with my bleach pen and called it good. Please make sure to put newspaper or cardboard inside the shirt, otherwise you'll have the reverse image on the back of the shirt ;)


Then you just wait...wait...and wait some more.
Then you rinse the bleach (which has gotten crusty) off in the sink and dry the shirt. You can wash it right away too if you'd like. I didn't have time to wash it. I didn't wait long enough for the bleach to do it's magic either. I think I may go back and put the bleach on again to get a more "white" flag. One way to tell if the bleach is working or to see how much more time you might need it to look on the inside of the shirt. The thing with bleach pens is they do tend to 'bleed' a little bit so don't try to do some really detailed picture...it won't work very well.

Here's my crew in their Patriotic ensemble! 
 And here's one photo from our sparkler fun on the fourth! I will be sharing more later on my blog!!
Hope you had a great and fun Fourth of July!! Here's to more summer fun!!
Continue Reading ...

Saturday, May 11, 2013

Happy Mother's Day

Happy Mother's Day...here are four of my greatest blessings.


I am so blessed that these four people call me mom. I wouldn't want my life any other way. I am also SO incredibly blessed that I am able to live close to my mother. She's such a tremendous help to me with my kids and it's just great to be able to see her regularly and live life with her nearby.

My sweet six year old filled this out for me at school. I LOVE these little things and they make me so happy and they make me laugh! I love that she thinks I'm as pretty as a horse...that's not usually a compliment but I know how much she loves horses. I also thinks it's great that she thinks I'm smart because I know math. I can do kindergarten math but that's about it. We'll leave the math up to her dad when she gets a little bigger!

I have so many thoughts about motherhood swirling in my head but rather than try to get them out in a way that you'd understand I'd like you to read a blog post that pretty much sums up how I feel about motherhood! I hope you'll take a moment to read Why Mother's Day is for the birds...

Happy Mother's Day!! I hope you are treated like the queen you are.

Continue Reading ...

Monday, November 12, 2012

Ranch Oyster Crackers

Just made these the other night and they are addicting. So addicting, they can be dangerous to a girls curves. LOL

I tripled my batch because I have a lot of munchers.

Here is what you will need for a double batch...because one is just never enough. ;)

2 bags of oyster crackers (about 10 cups)
2 packages of dry ranch mix
1 tsp of dill weed
1/2 tsp of lemon pepper
1/2 tsp of garlic powder
1/2 cup of vegetable oil

First....preheat your oven to 250˚ F

Second....in a large bowl, add in ranch mix, dill weed, lemon pepper and garlic powder. Mix in vegetable oil. Then stir in your oyster crackers until all have been coated with seasonings.

Third...place on baking sheet evenly and put in your oven for 10-12 minutes. Stir the crackers. Then continue cooking for an additional 15-18 minutes. Remove from oven and let cool.

Enjoy with soups, salads or just for snacking. They are a hit! I think these will be a go to snack for the kiddos! A great snack for holidays too!
Continue Reading ...

Monday, October 29, 2012

Halloween Breakfast

~ Goblin Boogers with a little Ghost Sneeze ~
We made a fun breakfast the other morning from a simple recipe. Remember Jamie's post about scrambled pancakes? You can see it here.  The directions are simple, we just added one thing and changed the name to make it fun for Halloween! LOL

Mix up your regular pancake mix according to the boxes directions. I used Bisquick. It called for 2 cups of bisquick, 1 cup of milk and 1 egg.

My extras....I add in cinnamon and sugar, and a little vanilla. I also add in a little more milk to make the batter thinner.

Now to make it fun for Halloween, just add in the green dye.

To cook...add a few pads of butter to your pan, pour in some batter and stir as if you were cooking scrambled eggs.  Keep cooking until all batter is cooked.

Sprinkle with powdered sugar and its ready to serve.

All that is left is coming up with a funny/gross name for your treat!

We decided on Goblin Boogers for ours. Then once the powdered sugar was added, we thought it would be funny to say a ghost sneezed on the Goblin Boogers. LOL

Hope you enjoy this fun Halloween Treat!
Continue Reading ...

Sunday, October 14, 2012

Guest Post - Pumpkin on my Bumkin


Hi, I'm Tricia from Made By Me. Shared With You, a little sewing blog that I try to keep up.  I'm excited to be here sharing one of my favorite projects, the Lil' Pumpkin appliqued bodysuit.  Being a mother of two little ones, I like projects that are quick, simple, and easy on the budget.  This little appliqued bodysuit can be made up during a nap time, and will have your little bundle of joy ready for Fall.
I call it the "There's a pumpkin on my bumkin applique".  There are very few times in life when it's okay to have pictures or words plastered on your bottom, but the baby stage is one (if not the only) acceptable stage. Having boys, I don't get to indulge in ruffled bottom tights and bloomers, so an appliqued onesie will have to work.
It's a simple little applique that I designed.  I'll share the file with you so long as you respect that it is for personal use only.  The template is designed to fit a pre-washed Carter's 0-3 month onesie.  You can feel free to adjust it to different sizes.
My applique is done with some scrap knit fabric that I have had stashed away, heat and bond fusible adhesive,  some embroidery thread, and lightweight fusible interfacing.
Begin by applying the heat and bond to the wrong side of the fabric.  
Next transfer the image to the front side of the fabric using pattern marking/transfer paper. Cut out your pieces.
Adhere the applique pieces to the onesie.  I had the small pumpkin in the front, and the large pumpkin on the behind.  It should fit right in line with the seams and snaps on the onesie.
 I used my embroidery thread to do some hand stitching.  I feel that it adds some visual interest to the applique.  You could do some machine stitching around the images if you prefer.  If you are using a fabric that frays (knits generally won't) you will want to ensure that you either satin stitch (tight zig zag) around the image, or apply some sort of fray check or fray block to the raw edges.
Once I was done with the applique and hand stitching I used some fusible interfacing to secure the embroidery threads, and prevent the thread from irritating babies chest.
That's it.
A fun little applique for the season.

You can find the template here.  Once again, the template is for personal use only.

Thank you so much Tricia for sharing this adorable lil bumkin with us today! We loved having you.

Please make sure you stop by and thank Tricia for sharing this with you. You can find her HERE.
Continue Reading ...