-
Showing posts with label 3 Sisters Hair. Show all posts

Thursday, May 2, 2013

Fancy & Fun Headband

I made this fun headband the other day for my girls.  It was easy to make and didn't take too much time at all.

...What you will need...

Plastic Headband
Ruffled Tulle
Ball Fringe
Flowers

First start by hot gluing on the ruffled tulle.  Don't go down all the way to the end.  That is just going behind the ear and may be uncomfortable to wear.
It should now look like this picture below.
Next, glue on the ball fringe. I tucked under each end to help keep it from fraying.
It's looking cute already. I think it would look cute just like this too. But today we added flowers.
I would usually like to make my own flowers, but these pre-made flowers make this headband quick.  And they are pretty cute too!  Just glue them on and you are done. Probably only took you about 5 minutes to make.
Here is my little model showing it off.  I have to say that we got pretty lucky in finding the dress she is wearing too. I made this headband thinking the colors would go with many of her clothes and then found this dress the next day while shopping. I couldn't pass it up.  She just had to put it on as soon as we got in the car. ;D  Our next stop was the grocery store and the cashier said she loved her outfit and especially the headband. She told her that she should sell them. We just might do that. LOL
Share your version of this headband by emailing me at trendytreehouse@me.com or by linking below in comments. 
Please link back to this post if you use this post. Thanks.
Please Check Out My Other Links Below
I would love to have you like, follow, connect and chat with you more!
tticon-pinteresttticon-facebooktticon-twittertticon-instagramtticon-etsytticon-shop
Continue Reading ...

Friday, August 3, 2012

Mix n Match Hair Clips

I made some hair clips for the girls and had to share them.
They turned out just how I wanted them to. 

What you will need...
Felt in various colors
Colorful fabrics
Buttons
Embroidery Thread and needle
Mix of felt and foam designs with button holes 
(found them at the craft store)
Hair clips of your choice
Hot Glue Gun and Glue Sticks

It's very simple. Just cut odd ball shapes of fabric, sew a button to it. Then embroider it to a piece of felt. Trim. Add it to a clip and cover the clip if you like with more felt. You can glue it or embroider the edges together to hold it on the clip. That's it. Now just take your designs with the button holes and mix and match them according to your baby's outfit. ;)

We mixed with one design, two designs and you can even wear them without a design.

Here are some variations of our clips.
Aren't they cute?!? You can have endless clip designs with all that fabric out there. Have fun with it and please come back here and share what you made with us. We'd love to see your creations.
Continue Reading ...

Sunday, June 10, 2012

HairBow Bangs ~ 3 Sisters Hair

I really have missed sharing some of my daughters hairstyles and thought I would start up again. Today I am sharing the "HairBow Bangs"hairstyle. You can use the HairBOW in so many different styles, so I am going to share a few in the coming weeks. Don't forget to check back. They will be cute!!!
Get this...you will want to buy some hair pins. They are perfect for this hairstyle and you can get them really cheap at beauty supply store.
NOT this...regular bobby pins can work but make it harder to get a clean looking bow. So I don't recommend it.

1...divide the hair on top, leaving the sides down. I just separated a square on the top of her head and put the rest of the hair out of the way in a pony tail. Part the hair leaving a small section in the back for later use. Make an inside out french braid in the front.
2...next take a small piece of hair from the back and make a loop. (adding pomade to the hair used for the bows helps keep the hair nicely in place)
3...slide your hairpin under one section of your braid and place the loop inside the pin.
4...place your finger back in the loop. Pull the hair pin back through to the other side. Don't take your finger out of the loop yet, you want to pull and slide the hair making a loop. Once your loop is done, remove the hair pin. You have your first bow.
5...you will have a little hair left over if your hair is long like my daughters. Just add that hair into your next loop. Continue loop and bows into each braid or every other braid. I did every other leaving a space but every section would be cute too! When you reach the end you can either work it into a braid or just finish with a pony. Hers is a pony.
6...the finished look. You can leave the hair down or put it into a pony tail. We did both. She wanted it up later.


This hairstyle is so cute. I guarantee you will get lots of oooo's and aaaa's. We do! The other thing I like about these bows is they stay in very well. After a long day of running around, my daughters bows looked the same. Ok, may be a few wispies here and there, but very nice. She has even slept on them before and woke up looking good. 
However, I don't recommend bed head bows, fresh ones are much nicer. LOL
Next week I will be sharing the "Headband HairBows" Hairstyle.
Hope you liked this style and come back to see the next. ;D
If you need help with this hairstyle....please email me at trendytreehouse@me.com I am happy to help.
Continue Reading ...

Friday, February 25, 2011

Headband Hairdo


My daughters love to wear headbands, but hate that they always slip off when they lean forward. So here is one of the ways I fix their hair to keep that from happening.
First you want to start with some ponies up front. With those tiny little elastic bands. 
TIP... I use a couple, sometimes three, because they tend to break easily throughout the day. Now that the girls are older and have thicker hair, I am going switch to horse bands. You can get them in a western store or horse product store. They are made for horse mane and tail braiding, but many of us mommy's like to use them on our lil ones.
Below is a pic of what you should have first. I made 5 mini ponies.
Next, place your headband under the pony tails. Right next to the bands.
Start on one side. I started on the left and worked my way across to the right.
Grab the first pony tail, all of it. The second pony, you will only take half of the hair. Now add those pieces to a section of hair that you parted on the other side of the headband and secure with a plastic band. 
Now take the rest of the second pony tails hair and half of the third, again grab a section of parted hair on the other side of the headband and secure with a plastic band. Continue this all the way across to the other side.
Your done. now your headband cannot slip off.
And your lil girl will be so happy. Mine thank me and give me big squishy hugs. LOVE THAT!
I just have to point out that adorable flower on her headband. Isn't it adorable? LOL I love it. It's so pretty. I bought this one, but I have some beautiful scarves that I am going to use to made some of these flowers. Tutorial to come soon.
Hope you enjoyed this lil hairdo tutorial.
Continue Reading ...

Thursday, February 25, 2010

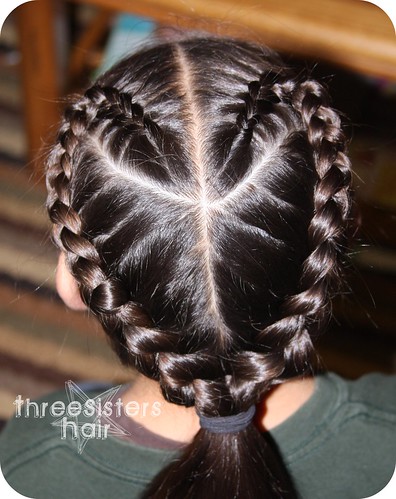
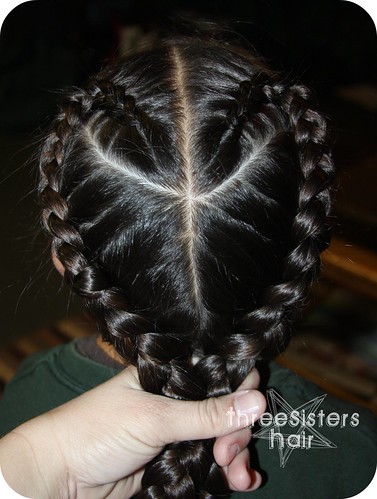
★ French Braid Heart Tutorial ★


Are you ready for another adorable Heart Hairdo?

Well I know this would have been nice for Valentines. Sorry. But you can still use this fun hairdo to go just about anywhere. I love it!

Ready to learn? Let's get into the directions....

IMG_2851
Step One: Parting the Hair
  • Part the hair right down the middle, making two pony tails. (Secure one side with a rubber band while you finish parting the other side.)
  • Take one side of your part and part it down the middle towards the ear. As if you were making a half pony on top. (secure bottom section with rubber band until ready to braid)
  • Now take the top half and part into triangles. (basically from the middle of the head towards the eye of the side you are working on. Secure the hair closest to the ear until ready to braid)
  • Do the same on other side of head. You should now have 6 sections of hair. 5 of them secured with rubber bands and one section ready to start. (in picture above, I put rubber bands on all sections so you could easily see the parts. It makes a pretty pattern, doesn't it?) LOL
IMG_2852
Step Two: French Braiding the hair
  • Start by taking your first top left section of hair. Braid from crown towards left eye. When you get to the end of your first section, remove the rubber band from the hair near the left ear and continue to braid down towards the back of the head. (see picture below) Are you starting to see your heart yet?
IMG_2853
  • Now remove the last section from your left side ponies and just continue to braid to the base of the neck. (try to braid to the middle rather than straight down. That way you make the point for your heart)
IMG_2854
  • Continue with Step Two for the right side of the head. (the picture below shows you what you should have after completing the braids on both sides.
IMG_2856


Step Three: Finishing Up
  • Now Gather the hair at the base of neck. Pull together making a point for your heart. (secure in place with a rubber band)
IMG_2857


That's all there is to this "French Braid Heart" Hairdo!
Now isn't that a cute style for any day !

IMG_2861

Tips on how to finish this Hairdo....
  • weave a ribbon through the braid to add color and a fun look
  • add a bow at the bottom of your heart
  • braid the bottom pony tail into a bunch of tiny braids and either let hang loose (LOL) below or pull up into a loop under the pony.
  • combine all three tips for a really FUN look!

Sharing at...

Continue Reading ...

Thursday, February 11, 2010

Criss Cross French Braid

I have posted this before on my another blog, but had to share it here too!

This simple braid is quick to do. 
With a very beautiful look.

When I posted it before, I had made it into a tutorial page for a hair book I am working on. So just click and print. It has all the directions. I hope you enjoy it as much as I do. In the finished book, hopefully coming soon, I will have different shaped french braids that I have learned over the past 20 years. Yep, 20. I have been doing hair since I was 13 for friends. Team mates would line up and I would fix hair before the game. Proms, Weddings, Parties. Even at a young age, I was working. Crazy me. LOL Yes I even started my own Babysitters Club with a friend of mine & sold girly accessories too. What can I say, it's in my blood. 

Anyway, I hope you all enjoy this simple hair fun from my "3 Sisters Hair" book.


Future Hair Tutorials to come.....

★ Puppy Dog Tails  Super Hero French Braid   More Heart Hair Styles 

★ 4 Strand Braiding  5 Strand Braiding  Twist Braid  Princess Hairstyles 

Sneak Peak


I am sharing here....


Continue Reading ...

Monday, February 1, 2010

Heart Hairdo - Valentine Tutorial


This is an adorable  Hair "do" for Valentines this year!

Here's what you do...

  1. Start by putting the hair into two piggy tails. (use rubber bands that match your child's hair so they don't show up. It takes away the effect of the heart)
  2. Separate one pig tail into 2 separate sections
  3. Twist or Braid 1 section. Secure with band and set aside.
  4. Now go to the other pony and do the same as you did in steps 2 and 3. (now you have two braids. Pull them together and secure with rubber band. It will lay in the center of your child's head where the part is.
  5. You should have 1 section left in each pony that is not braided. Go ahead and braid them now and secure with band separately. (they will be hanging down at this point)
  6. Now pull all three sections together forming the bottom of your heart. Secure with finishing band.
  7. Bobby pin the top of your heart in place. (otherwise the heart will look too straight) Basically give it a nice rounded shape.

That's it! Now you have a beautiful, quick, fun hair "do" for
Valentines Day!

I suggest....

  • braiding in pink, white or red ribbons
  • adding a bow at the bottom of your heart with long ribbons hanging down
  • wrapping the braids with ribbon, finish by tying a bow at the bottom of the heart
  • if you child has really long hair like mine, you can finish the pony tail on the bottom in many different ways.
    • braids - separate into 3 strands and braid each one so you have e braids hanging down
    • twists - do the same and twist 3 separate strands.
    • mix and match - twist and braid the bottom as well as leaving some hair hanging straight. This gives the pony a cute look.
    • let ribbons hang down in the pony tail


Another Super Cute Hair Share Link


Check out Yes, I do Hair
Sweat Heart Hairstyle

If you have any questions about this hairdo or want more instructions please email me. I would love to help! And share your hair creations photos at our Flickr Group too!


I am sharing here...
Continue Reading ...