Hey there! Been playing some more in Photoshop and today I wanted to share how to make a cool "clipping mask" photo. If you follow my pics on Instagram, you probably already saw this picture. But today I created a tutorial for it. I may have used a different font in the one you saw.
Anyway...I am excited to share it with you and hope that I can explain it well enough that you understand. And I have to mention, there are probably other ways to do this, this is just what makes sense to me. Hope it works for you too! I tried to make it as simple as possible. Here goes....
My before picture is already edited in Photoshop. I adjusted the brightness and contrast, added 4 different textures and used the brush tool to remove the texture from their faces. You can visit HERE to see my texture tutorial.
Because I added layers with the textures, the first step is to merge all the layers into one. Highlight all 5 layers, right click and select merge layers. You will now have one photo layer.
Next you want to add your text. In the tools, right click on your text tool and select Horizontal Type tool.
Type in what ever you like. I chose the word LOVE! Make sure you pick a bolder font and adjust the size. The bigger and bolder, the more parts of the photo will show through.
Use your move tool to place it where you want it on your photo. I liked the bottom left.
Now open up a new layer. It will be transparent to use your paint bucket tool to color it in white.
Time to rearrange the layers. You want the photo layer on top, then below that the text layer and lastly the new all white layer on the bottom. Below is how it should look.
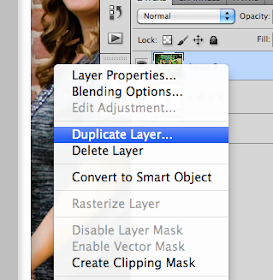
Before we create the clipping mask, you will want to duplicate your photo layer and drag it to the bottom of all the layers.
Your layers will now look like this below.
Go back up to the top photo. Click on it so it is highlighted. Right click and scroll down to Create a Clipping mask. This is the fun part. ;) The magic happens when you click it. LOL
SURPRISE! Your first Clipping mask. Ta Da!!!
Doesn't that look so cool. You can see your picture through the words.
You can crop and save many words with this process and use them as layers on other photos. Very cool!
You ready to make it even more exciting? Scroll below and read on.
Leaving the clipping mask like this on a scenery pic is fun, but with a pic like this, its fun to add the photo back in behind the mask.
Do this by highlighting on the white layer, right click and select blending options. In general blending, change the blend mode to lighten and the opacity to 50% or to whatever % you think looks best for your photo. Click on Ok and you are done!
Here is my completed pic from this tutorial. What do you think?
I love that the photo is faded in the back and the letters have the original color. Plus it is made from the same photo, so nothing is covered up in the photo. You get a nice clean look!
Here are a few more pics I made with this same process.
Ok, I'm off to edit more photos. Hope you like this post! If so, please let me know in the comments below!


This is a great tutorial! Thanks so much for sharing it :)
ReplyDeleteSo pretty, Tara! I've never seen anything like this before. Thanks for sharing!
ReplyDelete